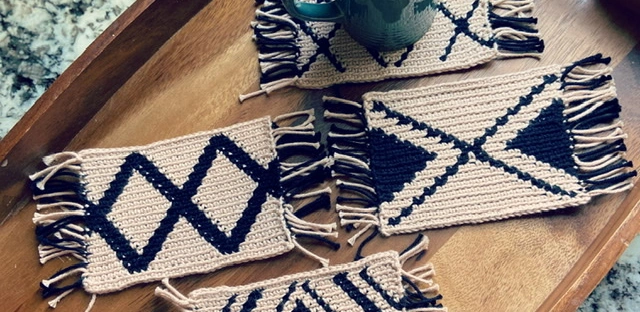
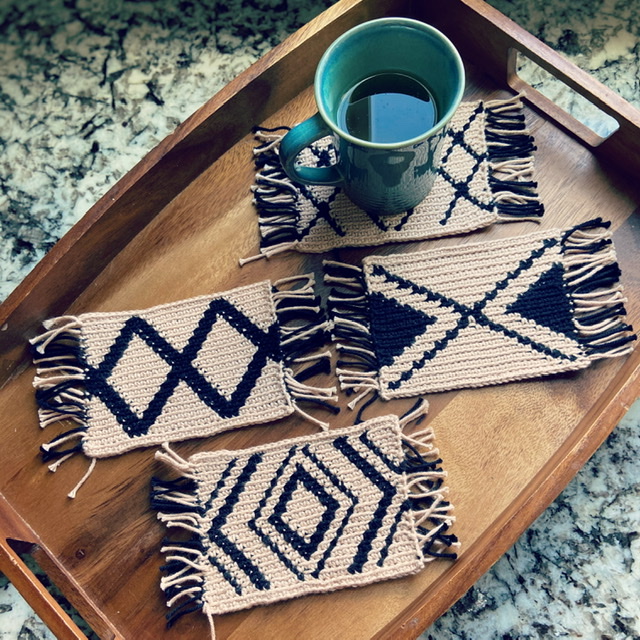
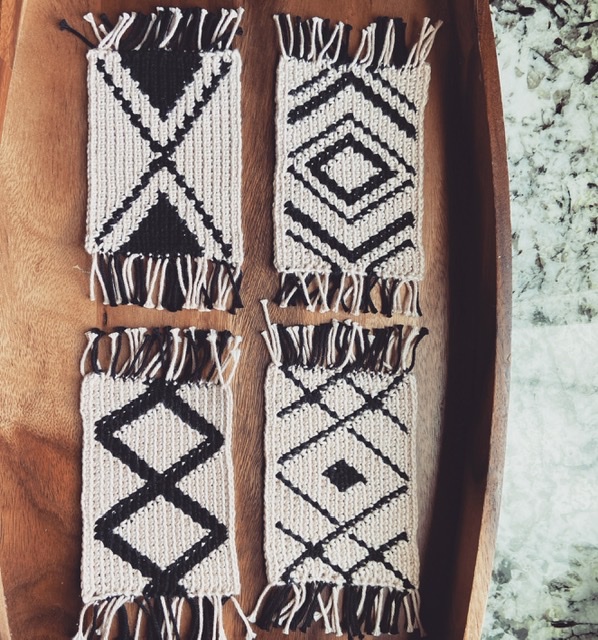
I have only just now discovered mug rugs and I love them! How can you not love something that looks like an adorable, tiny rug? You can use them however you want, but you definitely need one of these when you are enjoying a mug filled with a warm drink.
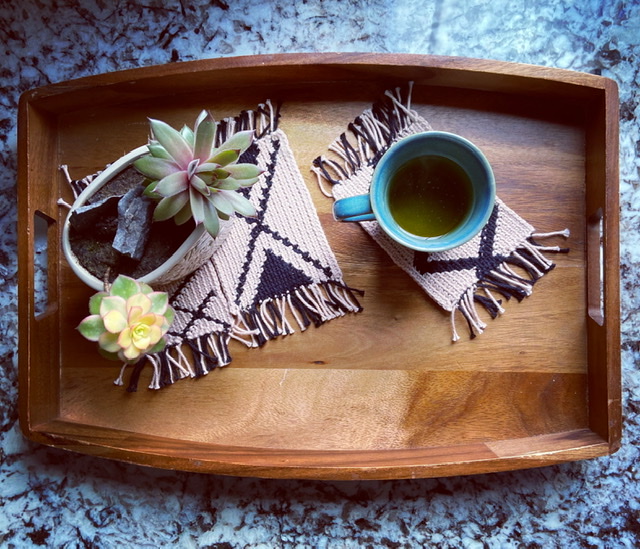
I think these would be a perfect gift idea! You could tie up a set with some twine or ribbon and call it good. Even better, pair them with some tea or a beautiful mug. You can switch up the colors, but I am partial to the black and white with these bold patterns. You could also include one or several solid color pieces for more visual interest.
This project was inspired by woven rugs. There are so many gorgeous woven rugs and I have been fantasizing for years now about making a woven rug inspired blanket – that may still happen some day by the way. For now, I am super excited that I can make these tiny versions. I love the little fringe and instantly knew that this would be an excellent tapestry crochet project. If you aren’t very familiar with doing a lot of color work, I think this is a great place to start as the rows are short and I’ll walk you through it.
Modern Mug Rugs
If you love this pattern or simply prefer a PDF download, you are in luck! I’ve created a PDF and it’s available on Etsy.
Supplies:
- Worsted weight yarn in 2 colors – I used Dishie: black and linen
- 3.5 mm crochet hook
- Scissors
Finished Dimensions: Each mug rug is approximately 4 inches tall by 5.5 inches wide (not including the fringe).
Abbreviations and stiches used:
- SC single crochet
- BLO back loop only
- CH chain
Pattern Notes:
As mentioned above, these are worked using tapestry crochet. If you’ve never done tapestry crochet, it’s a fun method that allows you to do beautiful color work without having to constantly cut your working yarn and reattach a new strand. Instead, you carry all strands behind your work and work your stitches over those unused strands. It is perfect for making items that need a little more structure such as bags and these mug rugs.
Some things to keep in mind when using tapestry crochet are that it’s important to use a small hook for a nice, tight fabric and it’s also important to work in the BLO because it helps to hide your unused strands of yarn.
For this particular project, you will work off a chart. (And I’ll explain how to do that soon!) You will work rows of SC stitches, cutting and fastening off at the end of each row and reattaching at the start of rows so that you will always work from right to left (for right handed crochet) and you will never turn your work.
To start a new row, draw up a loop in the color needed for the first stitch and CH 1. Then SC in the same stitch. Be sure to leave a tail of several inches at the beginning and end of every row because that will be the fringe! Super easy.
Carrying Yarn
You will work SC stitches into the BLO and carry the unused yarn as you go. In this case, we are only using two colors so you only have to manage two strands of yarn. Refer to the images below to see what I mean by carrying the unused strand.
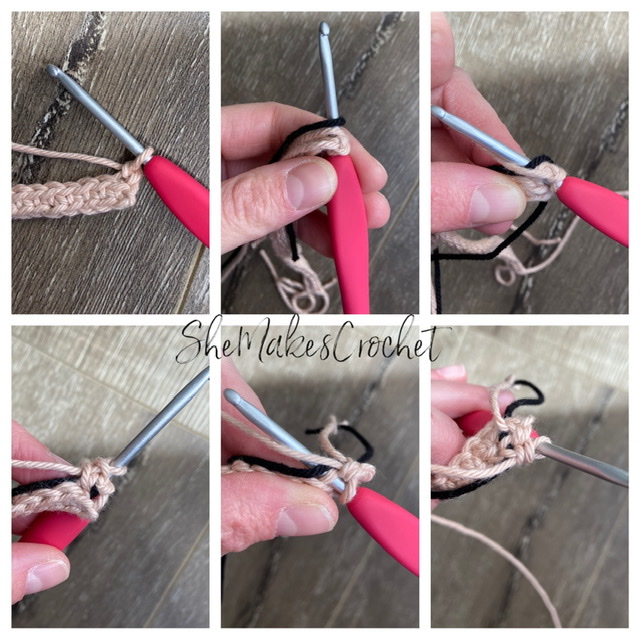
Image 1: I have pulled up a loop and completed a CH 1 ready to start the first row of my tapestry chart.
Image 2: I have inserted my hook into the BLO of the first stitch. Then, I drape the other color – in this case black – over my hook like pictured.
Image 3: Yarn over and notice how the unused – black -strand is laying on top of the row of stitches.
Image 4: First stitch completed and the unused – black – strand is caught inside the stitch.
Image 5: Inserting hook into the BLO of the next stitch, being sure to catch the unused – black – strand as pictured.
Image 6: Second stitch created. Note that this view is of the back and again, you can see the unused – black – strand caught inside the stitches.
Color Changes
The next thing you need to be able to do is make a color change. When working a color change, at the last stitch before the new color, insert your hook and draw up a loop, drop your working yarn to the back of your work and pick up the new color, yarn over with the new color and pull through completing your stitch with the new color. Now you will use the new color as the working yarn and the color you dropped will become the strand you carry. See the images below for further clarification on how to make color changes.
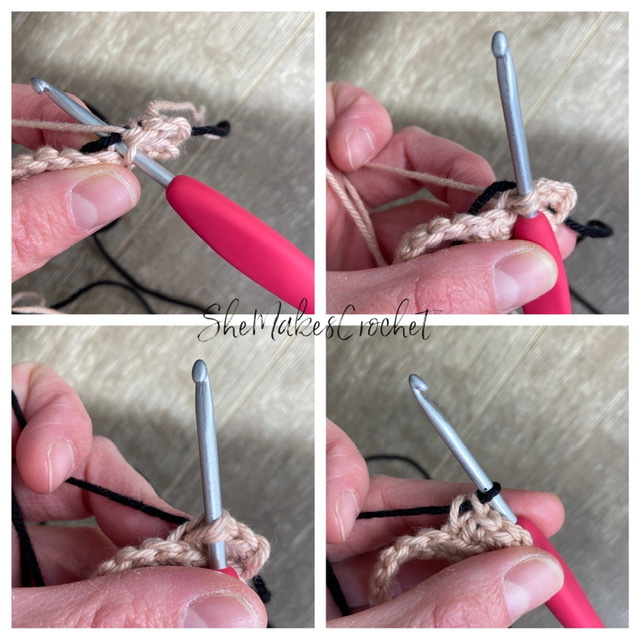
Image 2: And have drawn up a loop using white.
Image 3: Drop the white to the back of your work and pick up the black.
Image 4: Complete the stitch using black. Now back to my chart example, I am ready to start working stitches in black (and would carry the white yarn).
Working Off A Chart
Finally, you will need to work off a chart. In my case, as someone who crochets right handed, I will read the chart from RIGHT to LEFT (just like how you work from right to left). Reference the chart below. Each row of the chart is one row of stitches. So in this example, I would make 5 rows and each row would have 10 stitches. The very bottom, rightmost square of the chart (the purple square with the number 1) is the first stitch of the first row and the very bottom, leftmost square of the chart (the blue square with the number 10) is the last stitch of the first row. You would cut your yarn after making that last stitch and without turning your work, return to the first stitch to begin your second row.
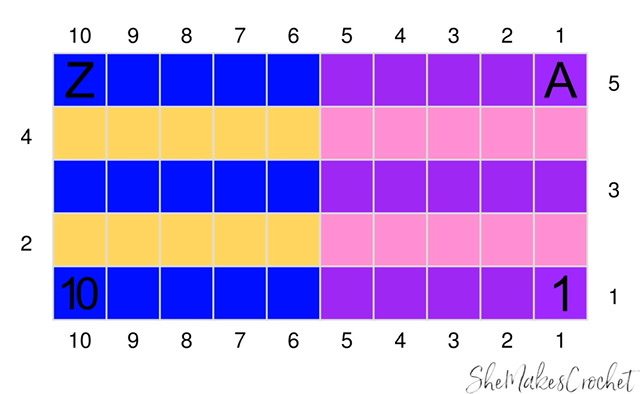
This time you would move up one row on the chart and the rightmost square of the second row of the chart (the first pink square directly above the purple 1) is the first stitch of Row 2. While the leftmost stitch of the second row of the chart (the last yellow square directly above the blue 10) would be the last stitch of Row 2. You would cut your yarn and again without turning your work return to the first block to begin working your third row while referencing the third row of the chart.
The reason you reference the chart is because that will tell you where to work each color. So for example, returning to the very first row of the chart (the purple 1), you would work 5 purple stitches and on the fifth purple stitch, you would change colors to blue. Then, you would work 5 blue stitches. Using this same sample chart, Row 2 would be 5 pink stitches and on the fifth pink stitch, you would change colors to yellow. Then, work 5 yellow stitches. You would continue along working 10 stitches per row, for a total of 5 rows. The final row (starting with the purple A) would be 5 stitches of purple and 5 stitches of blue (ending the chart on the blue Z).
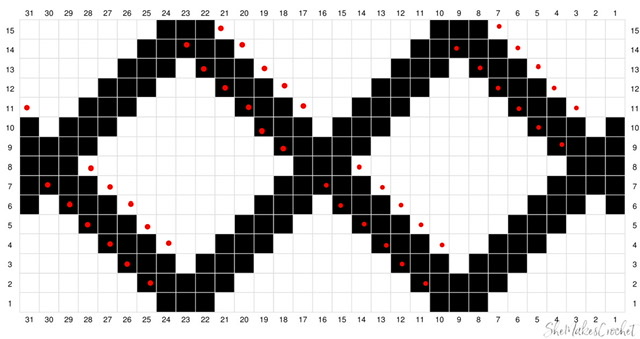
There are four different designs for these mug rugs, so there are four different charts. I feel once you have the idea down, you can follow any chart. However, if this is your very first time and you are feeling unsure, I recommend starting with Pattern 1 and 2 as there are less color changes to manage.
Pattern:
Note: Be sure to leave a long tail with both strands at the beginning and end of every row. This will be the fringe.
Using linen
- Row 1: CH 32, SC in the second CH from hook and into each remaining CH. Break yarn. (31 SC)
NOTE: From this point on, unless directed otherwise, you will always be working with two strands of yarn (one working and one carried). You will always fasten off and cut both strands of yarn at the end of the row. You will always work from right to left (for right handed crochet), without turning your work. You will always work in the BLO.
- Rows 2-15: Follow 1 of the 4 charts below, working tapestry crochet. If you need more instructions, skip down to the first chart (which is last).
- Row 16: Using linen only (i.e. do not carry the black) work 31 SC in the BLO.
- Skip down to “Finishing Up“.
Note: Due to the nature of crochet stitches, to get a cleaner line, at times it may be preferable to crochet through both loops instead of the BLO. As such, I have placed a red dot on all of the places I recommend doing this. That’s totally optional and you can choose to ignore them if you prefer.
Chart 2:
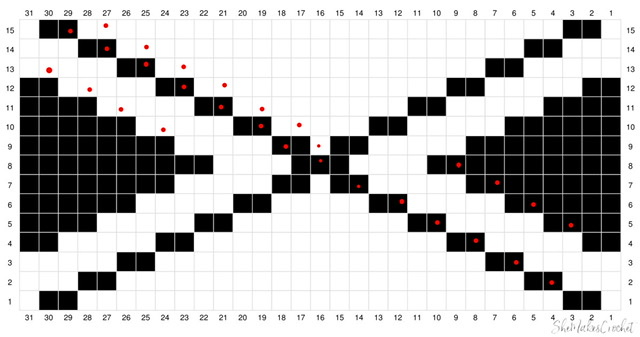
Chart 3:
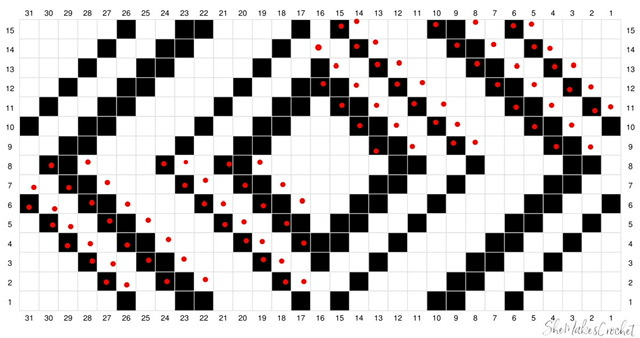
Chart 4:
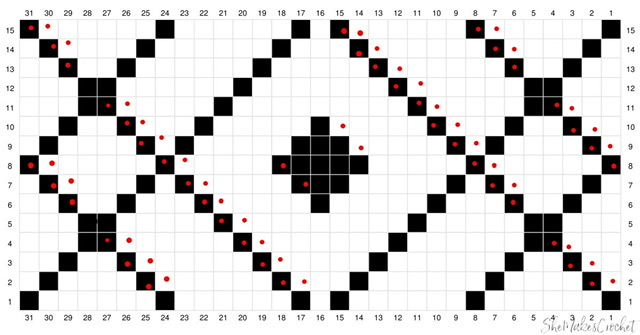
Chart 1:
Reading a Chart Continued
Looking at chart 1, start at the bottom, right corner (for right handed crochet) and reading that first row of squares going from right to left you should notice 7 white squares, then 3 black squares, then 11 white squares, then 3 black squares, then 7 white squares.
Those are your 31 stitches! So you would start with white (carrying black) and make 7 stitches. Change to black on the final yarn over of the 7th white stitch. With black, make 3 stitches (carrying white) and change to white on the final yarn over of the 3rd black stitch. With white, make 11 stitches (carrying black) and change to black on the final yarn over of the 11th white stitch. With black, make 3 stitches (carrying white) and change to white on the final yarn over of the 3rd black stitch. Finally, with white, make 7 stitches (carrying black).
That brings you to the end of Row 1. Fasten off and cut both strands of yarn. Do not turn your work and start back at the right side for Row 2.
Again, reading the chart from right to left, starting at Row 2, you should notice 6 white squares, then 5 black squares, followed by 9 white squares, then 5 black squares and then 6 white squares. Those are your 31 stitches of Row 2!
Repeat the process described above. So you would start with white (carrying black) and make 6 stitches. Change to black on the final yarn over of the 6th white stitch. With black, make 5 stitches (carrying white) and change to white on the final yarn over of the 5th black stitch. With white, make 9 stitches (carrying black) and change to black on the final yarn over of the 9th white stitch. With black, make 5 stitches (carrying white) and change to white on the final yarn over of the 5th black stitch. Finally, with white, make 6 stitches (carrying black).
That brings you to the end of Row 2. Fasten off and cut both strands of yarn. Do not turn your work and go back to the right side for Row 3.
Again, reading the chart from right to left, starting at Row 3, you should notice 5 white squares, 3 black squares, 1 white square, 3 black squares, 7 white squares, 3 black squares, 1 white square, 3 black squares and 5 white squares. Those are your 31 stitches of Row 3!
Repeat the process as described above until you’ve completed all 15 rows of the chart.
Finishing Up:
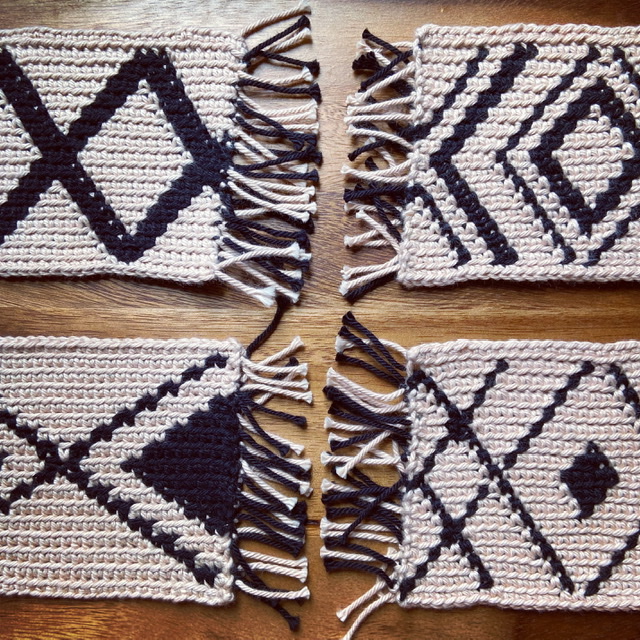
- Moving along both edges of each mug rug, knot two or three strands together to create the fringe. After securing all strands, trim evenly.
- Optional, I chose to block my mug rugs. You probably have noticed, they want to curl a little at the corners/edge. I rarely block my work and I’m not convinced it is completely necessary for this project as I suspect with time, they will flatten out. However, I didn’t want to wait. If you would like to block your work, this is the process I used. I pinned my mug rugs to an even size, stretching slightly. Then, I used my iron on the hottest setting with full steam and steamed each one. I did NOT iron my work (please don’t try that!). Rather, hold the iron very close to your work to allow the steam to penetrate. They got a little damp from the steam, but not very much. I left my pieces to cool for a couple of hours and they were perfectly flat!
I love when people share their finished pieces. If you share your work on facebook or instagram, please tag me so I can see it @shemakescrochet.
You are free to share your finished work, to include selling your finished products, but please credit me – SheMakesCrochet – as the pattern designer. Please do not distribute this pattern or any portion of it, instead direct people to my blog. THANK YOU!


Love the pattern I just wish I could print off the graphs….
I right clicked and saved each graph and then printed them
Oh my gosh, Deb what a great idea. I feel silly I didn’t think of that. Thank you so much for your help and input.
I think I might be able to…. I did buy the pattern so I will go there and see what happens 🙂
I’m not selling the pattern! Where did you buy it from? You should NOT have to pay it, I have not listed it for sale anywhere.
As for printing, I’ll have to try it before I can be of anymore help. With that, have you tried printing the webpage? Like I said, I haven’t tried it, but I’d imagine that would work and is what I would try.
Very clear directions and great tips – I’m a beginner at the tapestry and have fallen in love with Mud Rugs. Thank you. Just started chart 1 😀
Thank you so much for the positive feedback. I’m happy you are enjoying the pattern!! They are so fun to make.
One down, 8 more to go! I’m making to full sets plus one for my bedside table. Pattern and chart was easy to follow and it turned put great, thank you!
*two
I’m so glad you like it! Thanks for taking the time to leave some feedback. Enjoy finishing up the rest of them.
I just saw this on Pinterest now and I’m in love with it! I almost don’t believe you published this pattern for free… and even gave such detailed instructions! I will definitely make this, it will be my first tapestry work! Thank you so much! Just started to follow, you do a great job! ♥️
Thank you so much for your kind words and the follow, I appreciate it!
HOW WOULD I MAKE THESE BIGGER, LIKE TO USE AS A TABLE COVER FOR UNDER A PLANT OR LAMP? THEY ARE BEAUTIFUL BY THE WAY
I haven’t tried any of these ideas, but my two suggestions would be to either:
1. Double or triple layer your yarn and use a large hook to follow the pattern as written.
2. Scale the graph so that, for example each single square on the chart would translate to 4 squares – 2 stitches and 2 rows, or even 6 squares – 3 stitches and 3 rows.
I hope that helps! I don’t know when I’ll get around to it, but I have plans to eventually do something larger for plants 🙂
Wow! I can’t believe it! This is exactly what I was looking for when I went to Ravelry, hoping to find a mug rug that would accommodate a mug and my tiny trays for used teabags. I wanted Mosaic, and still am thrilled to find your pattern ~ and for FREE. Happy Birthday to me!!!
Thank you so much.
Oh my goodness, thanks so much for the smile. I hope you enjoy making and using these.
These are beautiful and such clear instructions, thanks
Thank you!
I am a beginner at Tapestry Weaving and am trying to weave your chart #1. It is generous of you to post these nice charts for free; they are very much in the Kilim style that I like so much. I hope I shall do them justice…
I love the Kilim style too and that’s what I was going for 🙂 I hope you enjoy the process and I’m sure your piece will turn out beautifully.
Hello! I am working on my first one and was wondering if you could show what the back of yours look like?