Sarvangasana: Health Benefits, How to do? – Variation
What is Sarvangasana?
Sarvangasana is a Sanskrit term, with ‘sarv’ defining all, ‘anga’ means all your body parts, while ‘asana’ is a pose.
Sarvangasana or shoulder stand is a yoga pose wherein the whole body is balanced on the shoulders. It is also a region of the Padma Sadhana yoga sequence. As the name indicates, Sarvangasana affects the functioning of all parts of your body. This asana is highly advantageous in maintaining mental and physical health and is also known as the ‘Queen of asanas’. As the name recommends, Sarvangasana is a full-body exercise, thus it works on different muscle groups and aids you in many ways to gain balance, better posture and calm.
What are the Health Benefits of Sarvangasana?
There are colossal benefits of doing Sarvangasana:
- The Sarvangasana enhances the function of the thyroid, parathyroid and pituitary glands due to the rising oxygen and blood. All of the other endocrine glands are managed by the pituitary gland and so the overall function of the endocrine system is improved. This results in the enhanced functioning of all other systems of the body and the reduction of emotional and mental stress.
- Stagnant blood from the lower parts of the body, i.e. legs and abdomen is drained to the heart thereby boosting the supply of fresh blood to these parts and the entire circulatory system. Blood supply to the head area i.e. brain, eyes, ears, nose and throat is enhanced thereby improving their functioning. Therefore all of the pelvic and abdominal area circulations, ear, throat and nose illnesses are improved.
- The lung capacity is improved as the diaphragm, which is the muscle of respiration, has to work against gravity in this pose, this aids in the abdominal respiration and is therefore helpful in the treatment of asthma. Toxins in the respiratory system are drained thereby enhancing the respiratory system.
- Avoids and cures varicose veins.
- Detoxification of the body due to increased efficiency of the organs of the body leads to youthfulness and anti-ageing effects.
- Normalizes body weight due to its effect on the thyroid gland.
- Due to the effect, this asana has on the hormonal system, particularly the thyroid, it balances the circulatory,
- reproductive, digestive, and nervous systems.
- Due to the raised blood flow to the head, the mind is tranquillized, and stress and psychological disturbances are decreased.
- The increased blood flow can be advantageous for those who suffer from headaches, though it should not be practised at the time of headache.
- The thymus gland is stimulated which improves the immune system.
- It balances the parathyroid glands which assure regeneration and normal development of the bones.
- It releases the normal gravitational pressure from the anus muscles which aids with haemorrhoids.
- The nerves passing through the neck are toned and the neck flexibility is improved.
- The digestive system is greatly improved due to the increase in blood circulation and drainage of stagnant blood.
- The pranic flow is harmonized, rising energy and having a positive effect on all the body systems.
- Sarvangasana has all the benefits of Shirshasana but is safer and easier to perform.
Benefits for Women:
- It is beneficial for the reproductive system as there is fresh blood in the pelvic region as the stagnant blood is flushed from the organs and therefore increased the efficiency of the reproductive organs.
- It strengthens the uterine ligaments as the gravity acting on the ligaments in Sarvangasana is in the opposite direction.
- It enhances the functioning of the ovaries.
- It aids to balance the moods and calm the mind.
What are the Preparatory Poses for Sarvangasana?
- Halasana
- Setu Bandha Sarvangasana
- Virasana
How to Perform Sarvangasana (Shoulder Stand)?
Lie supine with hands by your side.
With one motion, raise your legs, buttocks and back so that you come up high on your shoulders. Support your back with your hands.
Draw your elbows closer towards each other, and draw your hands along your back, creeping up towards the scapulae.
Keep extending the legs and spine by pressing the elbows down to the ground and hands into the back.
Your weight should be carried on your shoulders and upper arms and not on your head and neck.
Keep the legs firm. Raise your heels higher as though you are putting a footprint on the roof.
Bring the big toes in line over the nose. Now point the toes upward. Take care of your neck.
Do not press the neck into the ground. Instead, maintain the neck strong with a feeling of tightening the neck muscles slightly.
Compress your sternum toward the chin. If you experience any strain in the neck, come out of the pose.
Keep breathing deeply and hold the posture for 30-60 seconds.
To come out of the pose, lower the knees to the forehead.
Bring your hands to the ground, palms facing down.
Without raising the head slowly bring your spine down, vertebra by vertebra, completely to the ground.
Lower the legs to the ground. Relax for a minimum of 30-60 seconds.
How to do Sarvangasana by watching a video?
What are the Follow-up Poses for Sarvangasana?
- Halasana
- Purva Halasana
- Eka Pada Sarvangasana
What is the Beginner’s Tip for Sarvangasana?
- Keeping a straight line with the body.
- Keeping a healthy balance.
- Breathing from the abdomen.
- The throat and the thyroid can also be the centre of attention.
What are the Variations of Sarvangasana?
There are certain variations of sarvangasana:
- Supported Shoulderstand
- Ardha-Sarvangasana(Salamba Sarvangasana)
- Niralamba Sarvangasana (Unsupported Shoulderstand)
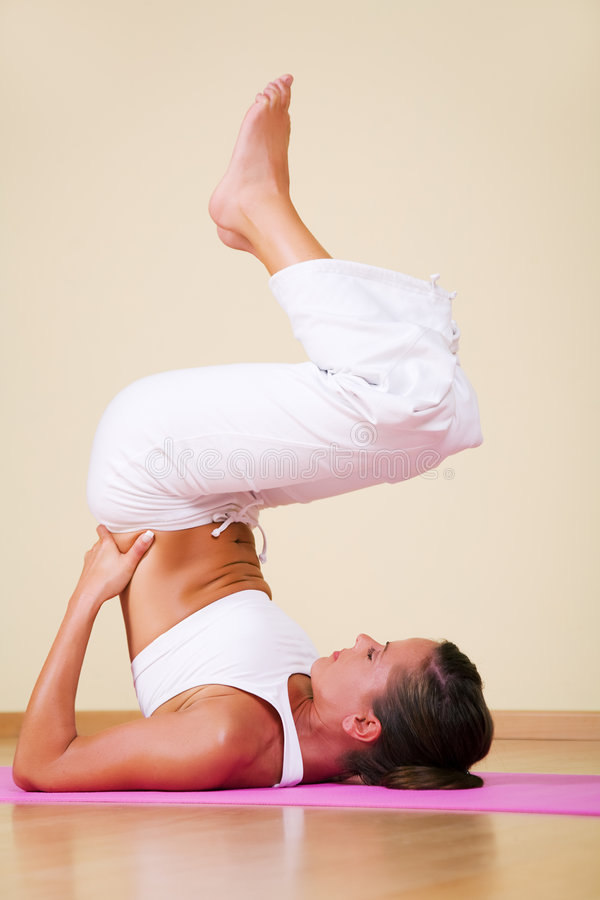
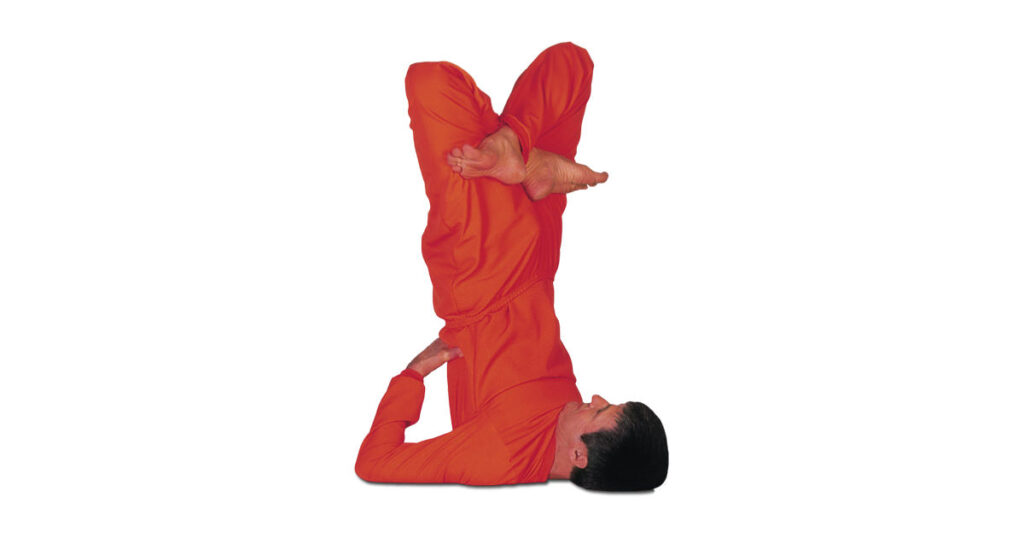
- Urdhva Padmasana in Sarvangasana
- Eka Pada Sarvangasana
- Eka Pada Parsva Sarvangasana
- Parsvaika Pada Sarvangasana
- Parsva Pindasana in Sarvangasana
Supported Shoulderstand
What is Supported Shoulder-stand?
This asana pronounces as sah-LOM-bah SAR-van-GAHS-anna.
Salamba means with support (sa = with ,alamba = support) , sarva defines all and anga means limb.
There are variations of Shoulderstand that are “unsupported” = niralamba, pronounced near-ah-LOM-bah)
How to do Supported Shoulder-stand?
Bend two or more firm blankets into rectangles measuring about 1 foot by 2 feet, and pile them one on top of the other. You can place a sticky mat over the blankets to assist the upper arms to stay in place while in the posture.
Then lie on the blankets with your shoulders supported (and parallel to one of the longer edges) and your head on the ground.
Lay your arms on the ground alongside your torso, then flex your knees and set your feet against the ground with the heels close to the sitting bones.
Exhale, press your arms against the ground, and push your feet away from the ground, drawing your thighs into the front torso.
Continue to raise by curling the pelvis and then the back torso away from the ground, so that your knees come toward your face.
Stretch your arms out aligned to the edge of the blanket and turn them outward so the fingers press against the ground (and the thumbs point behind you).
Flex your elbows and draw them toward each other.
Place the backs of your upper arms on the blanket and spread your palms against the back of your torso.
Lift your pelvis over the shoulders, so that the upper back is relatively perpendicular to the ground.
Walk your hands up your back (toward the ground) without letting the elbows spread too much wider than shoulder-width.
Inhale and raise your bent knees toward the roof, bringing your thighs in line with your upper body and hanging the heels down by your buttocks.
Compress your tailbone toward your pubis and rotate the upper thighs inward slightly.
Finally inhale and extend the knees, pressing the heels up toward the roof.
When the backs of the legs are fully lengthened, raise through the balls of the big toes so the inner legs are slightly longer than the outer.
Soften the tongue and throat. Firm the scapulae against the back, and move the sternum toward the chin.
Your forehead should be relatively parallel to the ground, your chin perpendicular.
Press the backs of your upper arms and the upper part of your shoulders actively into the blanket support, and try to raise the upper spine away from the ground. Gaze softly at your chest.
As a beginner stays in the pose for about 30 seconds. Gradually add 5 to 10 seconds to your stay every day or so until you can comfortably stay in the pose for 3 minutes.
Then continue for 3 minutes every day for a week or two, until you feel relatively comfortable in the pose. Again gradually and 5 to 10 seconds onto your stay each day or so until you can comfortably stay in the pose for 5 minutes. To come down, exhale, flex your knees into your torso again, and roll your back torso slowly and carefully onto the ground, keeping the back of your head on the ground.
Ardha-Sarvangasana(Salamba Sarvangasana)
What is Ardha-Sarvangasana?
Ardha Sarvangasana can be performed two times a day – once in the morning and then in the evening.
Benefits Of Ardha Sarvangasana:
- Aids in proper thyroid functioning.
- Strengthening of the abdomen.
- Stretches upper back.
- Improves blood circulation.
- Uplifts relaxation.
- Emphasizes the flow of blood and energy to the brain.
- Activates mental functions.
- Improves memory and concentration.
- Reduce some headaches.
- Treats dyspepsia, constipation, appendicitis, other gastro-intestinal disorders and varicose veins.
- Supplies a large amount of blood to the spinal roots of the nerves.
- Pauses loss of hair or premature graying.
- Improves facial complexion.
- Aids alleviate rheumatism.
- Remedies malfunctioning of the sexual organs.
- Elevates emotions of depression and neurasthenia.
- Treats problems of insomnia.
Ardha-sarvangasana steps:
Lie supine on the mat, feet together and hands placed beside the body.
Exhaling, move the feet close to the hips and bent the legs against the thighs.
Gently lift the lower part of the body vertically, with a drag of the abdominal muscles, supported by the hands (fingers under the hips and the thumbs above).
Balance the whole body weight upon the palms, the elbows, the neck and the back of the head (final position).
Finish the above steps in 4 seconds, while exhaling.
Maintain this pose as long as comfortable, but not longer than two minutes, breathe normally rhythmic, slow and natural.
Return to beginning position: Slowly lower the hips towards the mat, supported by the hands in 4 seconds, while inhaling.
Release the hands from the back and assume the beginning position.
Inhale a few deep breaths and then rest awhile, breath normally.
Variations for Ardha Sarangasana:
- Salamba Sarvangasana may be done on a strong and stable chair, with the legs resting on the chair back, the body supported by a bent blanket on the chair’s seat, and the shoulders and neck supported on a bolster on the floor.
- The hands may grab the back legs of the chair to open the chest.
- The pose is started by sitting astride the chair facing the back, raising the legs onto the back, holding the chair and leaning back, and then gliding down until the head reaches the floor.
- The pose is finished by bending the legs and sliding down carefully.
Precautions to be taken during the performance of Ardha Sarvangasana:
- For all head-low poses, great care should be taken to prevent any possible strain or jerks.
- The period of pose should be fixed at a minimum, i.e. 20 seconds in the starting to 5 minutes at the most.
- It is also advisable to attempt this posture first in parts and finish the pose only after a few weeks of initial training.
- Any head-low pose should never be performed after any form of rigorous gymnastics because the abnormal run of blood to the brain at this stage might do more harm than good.
- Unguided and hurried attempts to perform asana may lead to undue pressure upon the heart, the respiratory organs and the brain, thus, causing a feeling of giddiness or discomfort and expansion of the calibre of the blood vessels in the head.
Contraindications for Ardha Sarangasana:
- If you have Hypertension, heart illnesses, pregnancy, respiratory disorders, high myopia, glaucoma and retinal detachment conditions then avoid this pose.
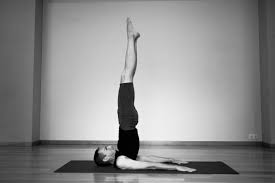
Niralamba Sarvangasana (Unsupported Shoulderstand)
What is Niralamba Sarvangasana?
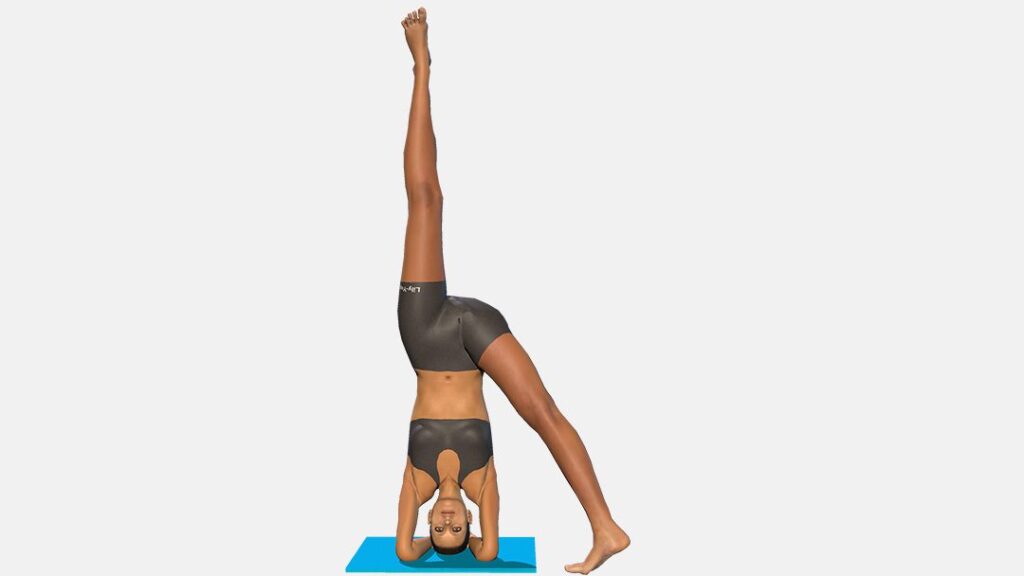
Niralamba Sarvangasana is a modern balancing inversion requiring flexibility in the shoulders and neck, while activating the thyroid gland, in addition to improving balance. From Sanskrit, nir defines to “without”; alamba refers to “support”; sarvanga refers “all limb” or “entire body”; and asana stands for “pose.” From Sarvangasana (shoulder stand), the arms are lifted alongside the body with the fingers spread and pointing skyward. The gaze is also toward the sky. In English, it is known as an unsupported shoulder stand. Niralamba Sarvangasana is a challenging variant to Sarvangasana (Shoulderstand Pose) performed without the support of the hands at the back.
Benefits of Niralamba sarvangasana:
- The whole body is toned by an increase in the flow of blood.
- Speedier healing from general weakness.
- Mother of asanas Low blood pressure.
- Strengthens the neck muscles and brings a large supply of blood to the brain thyroid and parathyroid glands.
- It also aids to relieve epilepsy, low vitality and anaemia.
- Stimulates the abdominal organs and alleviates people suffering from stomach and intestinal ulcers, severe pains in the abdomen and colitis.
- Relieves stress.
- Stretches the back of the neck.
How to do Niralamba sarvangasana?
Lie on your back on the ground with your legs stretched out and your palms facing down on the floor by the sides of the legs.
Breathe easily and then on an exhale flex the knees and take the legs to the stomach until the thighs are pressing into the stomach.
Breathe and lift the hips off the floor on an exhale.
Support the hips by flexing your elbows so they are flat on the floor with your hands on the back of your hips.
Lift the trunk off the ground until it is perpendicular to the ground.
Your chest should be pressing into the chin.
Exhale and stretch the legs straight up so they are pointing to the roof.
Keep stretching the body upwards till only your head, shoulders and backs of the upper arms and elbows are resting on the floor and supporting your weight.
Then release the arms and stretch them out on the floor so they extend over the head while still resting on the ground. Then lastly stretch them towards the legs as if you are reaching for your toes, keeping them tightly by the side of the body.
Hold here breathing easily for thirty seconds. Then slowly release the pose.
Modification of Niralamba sarvangasana:
If you would like to try Niralamba Sarvangasana but can’t attempt the pose for fear of falling and injuring yourself, consider trying aerial yoga. You can bind yourself in fabric to assure your safety, and the added benefit of aerial practice is to decrease pressure on the cervical spine. Alternatively, work with an experienced observer – someone who will correct your form if necessary and teach you in and out of the pose safely.
Precaution for Niralamba sarvangasana:
People with the below conditions are not allowed to do this pose:
- High blood pressure
- Heart conditions
- Arteriosclerosis
- Cerebral or another thrombosis
- Severe asthma
- Inflammation of the ear
- Weak eye capillaries
- Severe near-sightedness
- Problems in the pituitary or thyroid glands
- Tuberculosis
- Cold or sinusitis
- Excessively impure blood
- Slipped disc- Disc prolapse
- Weak spine or vertigo
Urdhva Padmasana in Sarvangasana
What is Urdhva Padmasana?
Urdhva padmasana or also known as an upward lotus is a yoga pose done in the ashtanga yoga finishing series followed by Sarvangasana. This posture must be performed only when one is proficient in padmasana and Sarvangasana.
“Urdhva defines upward and the Padma is lotus and asana refers posture”.
Benefits of Urdhva padmasana:
- This pose may assist in relieving the and even the chronic may disappear.
- This posture gives relief from asthma, palpitation, breathlessness, bronchitis, and other throat diseases.
- Daily practise of this asana eradicates common colds and nasal disturbances.
- This pose is suggested for those suffering from menstrual troubles.
- This pose stimulates the thyroid and parathyroid glands.
- Urdhva padmasana purifies the urinary and anal channels and causes the anterior section of the spinal column to become firm.
Preparatory pose for Urdhva padmasana:
- Sarvangasana
- Padmasana
- Halasana
How to do Urdhva padmasana in Sarvangasana?
Lie down straight on a yoga mat with face up and on the back full length. Keep the hands a little far from the thighs.
Keep the legs extended, and tightened at the knees. Position the hands by the side of the legs, palms down.
Inhale a few deep breaths. Exhale slowly and at the same time lift both legs together and bring them perpendicular to the body. Stay in this position and inhale, keeping the legs steady.
Exhale, again lift the legs further up by raising the hips and back from the floor, pressing the palms gently against the ground.
When the whole trunk is raised off the floor, fold the elbows and place the palms on the ribs, resting the shoulders well on the ground. This position is known as Sarvangasana.
Now flex the right leg at the knees and put the right foot on the root of the left thigh and flex the left leg at the knees and put the left foot on the root of the right thigh forming padmasana.
Flex the folded leg so that it is parallel to your face and put your hands on your knees to support.
Hold the posture for five deep breaths or half a minute.
Follow up poses after Urdhva Padmasana:
- Matsyasana
- Uttana padasana
- Shirshasana
Contraindication for Urdhva padmasana :
- People suffering from high blood pressure should not perform this pose.
Eka Pada Sarvangasana
What is Eka Pada Sarvangasana?
It is also known as a One-legged Shoulderstand Pose, or One-Legged All Limbs Supported Pose.
Eka Pada Sarvangasana arrived from the Sanskrit name that comes from five words — eka + pada + sarva + anga + asana:
“eka” = “one or single”
“pada” = “foot or leg”
“Sarva” = “all”
“anga” = “limb”
“asana” = “pose or posture”
Sarvangasana, famous as the Mother or Queen of Asanas, is examined as one of the most important asanas of all asanas. While it initially needs some effort to maintain the lift, with practice it becomes a calm and cool posture. Eka Pada Sarvangasana (One-legged Shoulderstand Pose) is a more asymmetrical type of the Sarvangasana and allows you to concentrate extra on opening your hips and cultivating strength and flexibility in the hamstrings.
As in the full version, Eka Pada Sarvangasana is usually done at the end of a sequence, as the mind and body wind down. It can also be joined with Salamba Sarvangasana and used as a transition posture. It can be included equally in the first exercise, given it is followed by other calm postures such as supported forward bends.
Benefits of Eka Pada Sarvangasana (One-legged Shoulderstand Pose):
- Fixes thyroid gland problems: It aids in putting pressure on the thyroid gland, which raises the blood flow in it. This yoga pose decreases the need for medical treatment and maintains thyroid balance in normal individuals.
- Reduce hair loss: The One-legged Shoulderstand massages the scalp and provides nutrients to the hair. It makes your hair roots strong and avoids hair fall.
- Improves Cardiovascular Health: Because the posture is a head-down body-up posture, it increases the flow of oxygen-rich blood to the heart. Performing Sarvangasana, the overall functioning of the heart is greatly improved.
- Increase flexibility: The Eka Pada Sarvangasana (One-legged Shoulderstand Pose) carries the weight of the whole body of the shoulder, so it makes them stronger. A strong shoulder increases the range of motion of the surrounding muscles, which is especially required in sports such as cricket and football.
- Balancing throat chakra: Eka Pada Sarvangasana (One-legged Shoulderstand Pose) narrows the neck area, eliminating any lumps due to an imbalance of Vishuddha chakra. A balanced throat chakra brings purity to your speech and releases the strained muscles of the neck.
- Effective in diabetes: In diabetic patients, Eka Pada Sarvangasana with specific pranayama can activate the endocrine part of the pancreas responsible for insulin secretion.
- Helps in digestion: Changing the gravitational stretch of the abdominal organs in the reverse pose like Sarvangasana and Eka Pada Sarvangasana increases the efficiency of bowel motion and the digestive system.
- Helpful in reclaiming PMS and fertility: This posture has proved to be an effective way for women to lead reproductive healthy lifestyles. This yoga asana avoids cyclic changes associated with the ovarian cycle or premenstrual syndrome (PMS). It also aids in regaining fertility in infertile women.
Preparatory Poses for Eka Pada Sarvangasana :
- Setu bandha Sarvangasana
- Halasana
- Hero Pose
How to perform One Leg Shoulder Pose?
Let us all take to a pose where we are in Salamba Sarvangasana or Shoulder Pose. Hold the pose, to begin with, this pose.
As you inhale in and exhale out slowly bring down the left leg as we do in Halasana while keeping the right leg in the shoulder stand pose.
The left leg should be stiff and straight with no bends in the knee joint.
The same rule applies to the right leg which is standing straight with no bends in the knee joint.
Hold this pose for some time and then try to do the same pose for the other side which means right leg down and left leg up.
Follow-up poses for Eka Pada Sarvangasana:
- Wheel pose
- Corpse pose
- Supported headstand
Caution for Eka Pada Sarvangasana:
- Now for those who could reach the ground, one can just bring the legs as closer to the ground as possible without bending the knee joints.
- Again try not to flex the knee joint to either support or reach the last position.
Contraindications for Eka Pada Sarvangasana:
- Prevent Eka Pada Sarvangasana (One-legged Shoulderstand Pose) during pregnancy and menstruation.
- By performing this yoga pose the blood flow is reversed which can do more harm than good in this situation.
- People with high blood pressure, heart disease, glaucoma or high myopia range should consult a specialist.
- People with sciatic nerve conditions, Neck or disk injury, or spinal or shoulder injuries should prevent this yoga asana.
Eka Pada Parsva Sarvangasana
What is Eka Pada Parsva Sarvangasana?
Eka = one or single
Pada =leg or foot
Parsva=sideways
Sarvanga= shoulder
asana= pose
How to do Eka Pada Parva Sarvangasana?
Start by lying down on the ground with the arms by the side of the body.
Bend the knees and raise the hips.
Keeping the hips raised, bring the legs to the left side, the right heel in line with the left hand.
Bring the left hand under the sacrum/middle of the pelvis to support the body, while keeping the right hand on the floor.
Bend the right knee and lift the leg closer to the body.
take a pose into Salamba Sarvangasana, the hands supporting the back.
Bend the right knee and bring it closer to the body, while keeping the left leg straight, in line with the torso. Permit the pelvis to tilt forwards. Slowly support the right side of the body with the right hand, holding the waist.
Release the support from the right hand and rest the arm on the floor.
Slowly lower the left leg, keeping it above the hips.
Keep the balance on the shoulders and the left hand, when stable, extend the right arm to the side, in line with the shoulder to counter the weight on the left.
Variation and Modification Eka Pada Parva Sarvangasana:
- Bring the legs into a butterfly pose and allow the knees to open sideways.
- For those with limited motion in the hips and/or challenged by balance-Practice a one-legged bridge position to get used to supporting the weight of the leg.
- For those with decreased wrist extension / with current wrist injury -Practice this position by resting the hips on blocks. Concentrate on extending and lowering the leg for an ideal hip extension. The hand supporting the body can be turned outwards so that the fingers are facing sideways/holding the waist.
Contraindication for Eka Pada Parva Sarvangasana:
- Pregnancy and spine related problems
Parsvaika Pada Sarvangasana
What is Parsvaika Pada Sarvangasana?
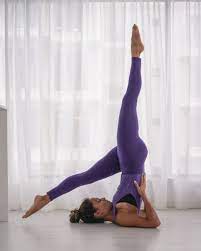
Parsva means the side. In Eka Pada Sarvangasana the lower leg places behind the head, whereas here it rests sideways in line with the trunk.
Benefits for Parsvaika Pada Sarvangasana:
- This pose is said to eliminate constipation due to the contraction given to the abdomen.
- This position also tones the kidneys.
- This posture is great for Throat Chakra.
How to do Parsvaika Pada Sarvangasana?
Do Eka Pada Sarvangasana on both sides and come back to Sarvangasana.
Exhale, and move the left leg down sideways to the floor until it is in line with the trunk.
Keep the left leg straight and stiff and do not flex it at the knee.
If it is not possible to touch the ground, lower the leg as far as possible.
The right leg which is vertically up should be kept straight and not allowed to tilt to the left.
The ribs should be raised with the palms to expand the chest fully.
Hold the pose for 20 seconds with normal breathing, exhale, and go back to Sarvangasana.
Repeat with the opposite leg for the same length of time and return to Sarvangasana.
Parsva Pindasana in Sarvangasana
What is Parsva Pindasana in Sarvangasana?
Parsva means the side or flank. In this Pindasana variation of the earlier posture, both the flex knees are moved sideways and placed on the ground on the same side of the trunk. This is the lateral embryo pose in Sarvangasana.
How to do Parsva Pindasana in Sarvangasana?
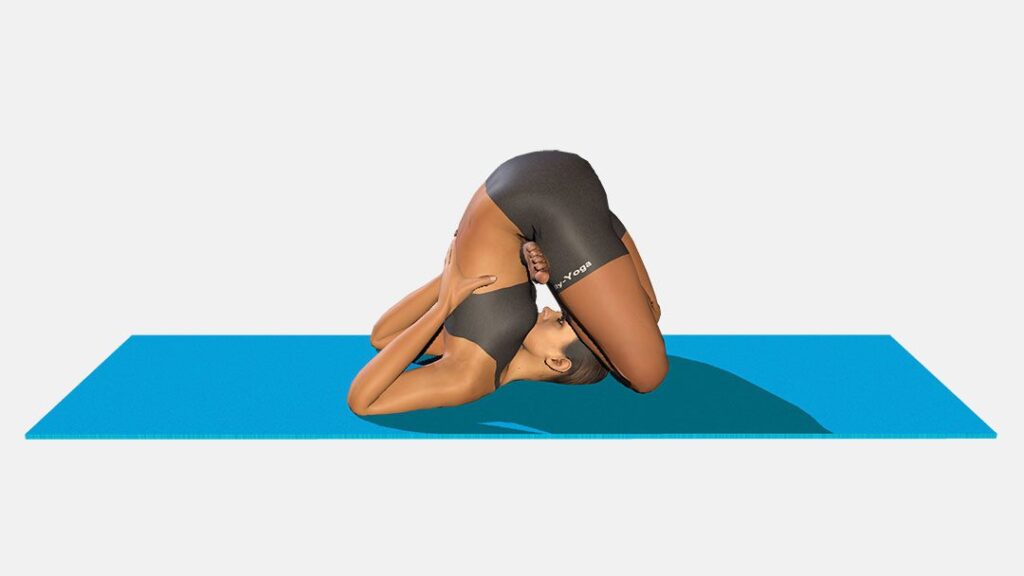
After staying in Pindasana turn the hips sideways to the left, exhale and lower both knees to the ground.
The right knee should be by the side of the right ear.
The right shoulder will be raised off the ground in the beginning.
Push the shoulder against the ground and press the right hand firmly against the back.
If this is not done, you will lose balance and rotate over to one side.
Due to the lateral twist, breathing will be fast and hard as the diaphragm is pressed in this pose.
The knee near the ear will not rest on the ground to start with, but only after long practice.
Hold this position for 20 to 30 seconds, with normal breathing.
Exhale, come up from the left side and move the crossed legs over to the right so that the right foot will be near the right ear.
Hold here also for the same length of time.
Go back to Ûrdhva Padmàsana. Let go of the lotus pose by uncrossing the legs and return to Sâlamba Sarvangasana.
Now change the position of the crossed legs.
Cross the legs again by putting the right foot over the left thigh first and then the left foot over the right thigh instead of the other way as done earlier.
Repeat the motions on both sides as described earlier.
What are the Modifications and Props for Sarvangasana?
- Rolling up into Sarvangasana from the ground might be difficult at first. You can use a wall to assist you to get into the pose.
- Place your blankets up a foot or so from the wall (the perfect distance depends on your height: Taller students will be farther from the wall, shorter students closer).
- Sit sideways on the support (with one side toward the wall) and, on an exhalation, sway your shoulders down onto the edge of the blanket and your legs up onto the wall.
- Flex your knees to right angles, push your feet against the wall and raise your pelvis off the support.
- When your torso and thighs are perpendicular to the ground, raise your feet away from the wall and complete the pose. To come down, exhale your feet back to the wall and rotate down.
What are the Do’s and Don’t for Sarvangasana?
Do:
- Knees should be extended and toes should point to the sky.
- From the chest to the tips of the toes, try to maintain your body in a straight line.
- Straighten your neck and direct your look on your toes.
- Make sure the trunk is vertically raised sufficiently for the chin to rest comfortably against the chest.
Don’t:
- Flex the knees.
- In the chin lock pose, move the neck or over strain it.
- When in the asana position, draw the legs over the head, but don’t hold them entirely vertical if it causes stress.
- Raise your head off the floor.
- Tense your legs or point your toes to avoid blood from draining from your legs.
What are the Contraindications and Cautions for Sarvangasana?
There are ceratin contraindication and cautions for Sarvangasana:
- Diarrhoea
- Headache
- Neck injury
- High blood pressure
- glaucoma
- Cervical Spondylosis
- Slip disc
- Menstruation
- Pregnancy: If you are experienced with this asana, you can continue to practice it late into pregnancy. However, don’t do the practice of Sarvangasana after you become pregnant.
- Salamba Sarvangasana is considered to be an intermediate to modern pose.
- Do not perform this position without sufficient prior experience or unless you have the supervision of an experienced instructor.
- Some schools of yoga recommend performing Salamba Sirsasana before Salamba Sarvangasana, others vice versa.
The Bottom Line
Although the technique of doing Sarvangasana appears challenging at first, it can be mastered with practice. The practitioner can experience the asana’s many health benefits once they have a grasp on it. To stay hale and healthy, it is best to practice this daily. Sarvangasana can provide you with a wide range of health and fitness benefits. As a result, practice Sarvangasana at home daily, starting with 2 minutes.

Author: Dr.Nidhiphysio
Physiotherapist in Mobile Physiotherapy Clinic Bapunagar, Ahmedabad