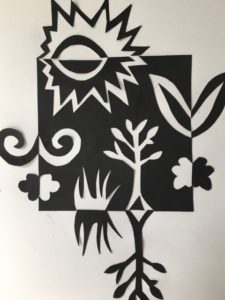
Objective: Experience this Japanese design concept which involves the placement of high contrast elements to create balanced light and dark areas in a composition. In art, dark and light need each other to exist. Basically, you can’t have negative space without positive space, and vice versa. One of the most familiar symbols illustrating this concept is the yin and yang form. This project can be altered to suit any age. We have done a very simple version for students as young as 5 years old, while older students and adults can integrate fine details and intricate patterns.
*These particular directions demonstrate the “square expansion” technique but there are many ways to create NOTAN. Research and experiment with different styles.
Materials:
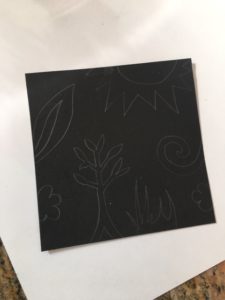
- Black paper cut into a perfect square. I used a piece measuring 4 x 4, but you may want a larger piece to work with, especially with younger children.
- Pencil
- Scissors (or craft knife for more intricate cuts)
- Glue
- White paper for mounting that is significantly bigger than your black square (the square will end up doubling in size, and in all directions once complete).
Directions:
- Lightly draw shapes on your black square making sure that you start and end your line on the same edge of the paper square. You can go with either geometric or organic shapes but keep it simple so that they will be easy to cut out. If you want to add detail, then try drawing a line within a line that will create a “double cut”. You may also want to be conscience of keeping the line of symmetry in line with the edge of the paper. For example, if you want a heart shape then you will only draw half of the heart.
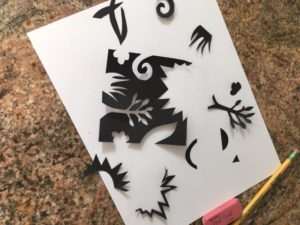
- Cut your shapes using your careful cutting skills trying your best to stay directly on the line. Craftsmanship counts in this project! You will need every shape you cut out so be careful not to lose any.
- Glue down the main, central square into the center of your white paper.
- Place all the cutout pieces back into the original square so it all fits together like a giant puzzle piece. (This step makes it easier to know what position to glue them).
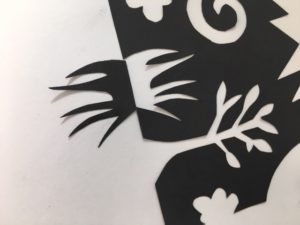
- Expand the square by flipping each piece backward so that the pieces open up like a book. Once everything is lined up perfectly then you can glue them down, working your way around the square.