
Hiking the Subway
The Subway, that elusive hike at Zion National Park, or so we thought. Planning our road trip, we quickly disregarded the Subway assuming the permit would be too hard to get, or the hike would be too difficult or require equipment we didn’t have. Well, we did it. So, if you’re interested in the hike, here’s what we learned.
The Permit
There are 80 permits given each day, 60 of them reserved months in advance, and 20 given through lottery the day before its use. When we went to enter the lottery, they had already drawn for every day except the last one that we were in the Zion area. It showed that over 100 people had already entered for the 20 spots.
We didn’t like our odds, so we didn’t enter. Instead, we went into the wildness permit office and asked about dropouts or people who reserved a permit early but had to back out for whatever reason. With the recent flooding and closing of famous hike Angel’s Landing, we hoped someone would’ve canceled their trip to the subway.
The desk manager told us, that he could only issue permits the day before their use, so we crossed our fingers as he looked up the following day’s permits – a day which the lottery was already closed for – and sure enough, there were two permits available. We signed our waivers, paid the $15 and were on our way, after listening to the lecture on the many ways we could die on the hike, of course.
The Hike
Being short on equipment, we opted for the bottom up hike. The top-down is a technical canyoneering route, which although sounds like a thrill, we weren’t prepared for. The bottom-up hike is a there and back, almost 10-mile hike each way. The trail is not marked, and in many places requires scrambling over boulders and walking up the river. It’s not for the faint of heart. But, if you’re willing to push through, the subway is extremely rewarding. While many threaten that it’s easy to get lost on this hike, if you follow one simple rule you will survive; follow the river.
Part of the park ranger’s advice was to get a detailed route description before the hike. There is an app I will recommend for any hiker, AllTrails. It has detailed trail information on every hike I’ve ever done, no matter how obscure. You can access your location on the trail viewing through a variety of overlays such as satellite, topography, OSM, terrain, OCM, and Roads. Your hike is graphed by distance vs. elevation and includes points of interest along the way. Needless to say, this app can be a lifesaver when you’re off the grid, but there’s one catch, what do you do when you don’t have internet?
I have a subscription to AllTrails which resolves this problem. For $30 a year or $99 for a lifetime, you have full access to download hikes and access everything offline. This is what we did for the subway. My favorite view is by satellite because I’m a landmark person.
We followed the trail very closely on the way to the subway, and it took a total of 4.5 hours to reach. We did this in response to the ranger’s threat of “many false trails” along the way. He said they didn’t want to clutter the land with wrong way signs, but many of the wrong trails would look appealing. However, even if you stray from the “official trail” which is not much of a trail, and just stick to the river, you can’t miss the subway. Knowing this, the hike back took only 3 hours, as we created our own trail wherever we saw the least resistance. So, there is an advantage and security in having access to AllTrails, but if you don’t want to pay the subscription, at least for this hike, you may not need it.
Route Description
This is what you can expect. From the small parking lot at the trail-head, you follow the trail down into the valley where the river is. The way down has a lot of loose rocks and sand and can be very slippery at parts. The steep descent, however, is a mere 1/5 of the total distance, and it can be easy to forget that on the way back, your last efforts will be used in going back up. Make sure you save enough water for the climb up at the end.
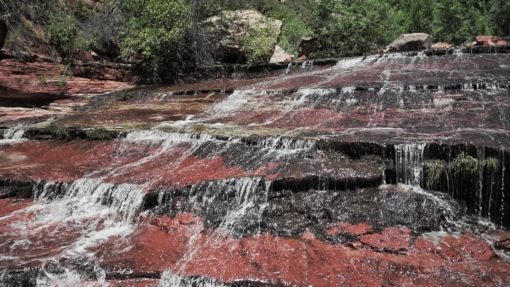
Once down, you begin to follow the river. This goes on for a while. At parts, you’ll find it easier to trudge through the water, and at others to follow a small dirt path that easily leads alongside the water. Either way, eventually, if you follow the river, you will begin to find many small waterfalls. The entire route if full of small falls, however, as you near the end long cascading falls will appear. These go over areas of slippery rock, but the best way up is through the water. In the heat, the water is refreshing so I never minded walking through the river.
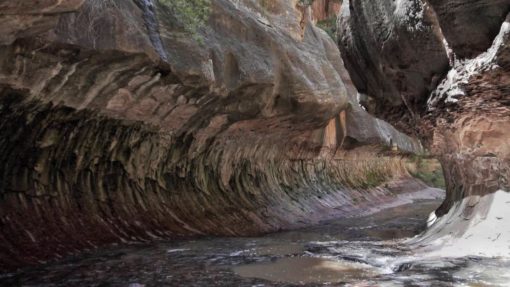
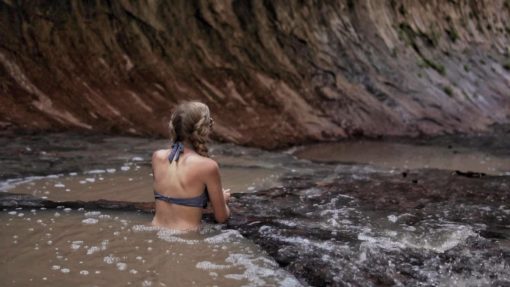
As you near the Subway, the canyons will narrow around you but don’t worry about missing it, you’ll know when you’re there. The canyon walls come a few feet apart creating the top of the subways and small but deep pools are throughout the bottom. Beware, no matter how hot the outside temperature is, these pools will be cold. I read beforehand that many advise wet-suits for the plunge, but I assumed that was unnecessary in July. I was right and wrong. The water wasn’t so cold I needed a wet-suit, but cold enough that I only jumped in to snap a few pictures. If you come during the warmer months, the hot hike will make it much more refreshing, so don’t make the mistake we did and eat lunch to cool down. I would’ve rather jumped straight in.
From here, with the bottom up hike, all you have left to do is turn around and do it all again. From start to finish, we took 9 hours to experience the Subway. This included a 1.5-hour break at the Subway and about 7.5 hours of hiking. Although it was tough, it was well worth the hassle and was an achievement far fewer get to boast of than the many hikes at Zion. If you get the chance to grab a permit, don’t hesitate.
More blogs like this:
One thought