
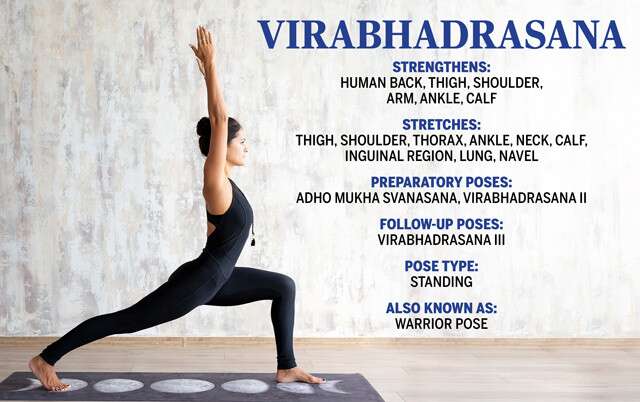
Virabhadrasana or Warrior Pose is a group of related lunging standing asanas or yoga poses. The asana is pronounced as Vee- Ra- Bha- Dra-asana. Warrior Pose I is one of the three Warrior poses that beautifully combines both the standing and balancing actions of the body.
“Although foundational in nature, what makes Virabhadrasana series unique, powerful, and a bit complex at the same time, is the fact that you are required to balance simultaneous movements in different directions,” feels Suman Chhabria, Certified Yoga instructor and founder of Anaya who says this act of balancing directly works on creating stillness in the mind, building focus, power, and stability, thereby improving health at a holistic level.
“Also, it teaches us to develop a sense of balance and become more aware of body positioning,” she says. In Sanskrit, Vira = Hero or Warrior or Vigorous and Courageous and Bhadra = good or auspicious. Named after the fierce Warrior Virabhadra, as per the Hindu Mythology, the warrior Virabhadra was created by Lord Shiva, symbolizing our inner ability to overcome ego and ignorance.
VIRABHADRASANA I
Benefits Of Virabhadrasana I
Contraindications Of Virabhadrasana I
VIRABHADRASANA II
Benefits Of Virabhadrasana II
Contraindications Of Virabhadrasana II
Virabhadrasana III
Benefits Of Virabhadrasana III
Contraindications of Virabhadrasana III
FAQs:
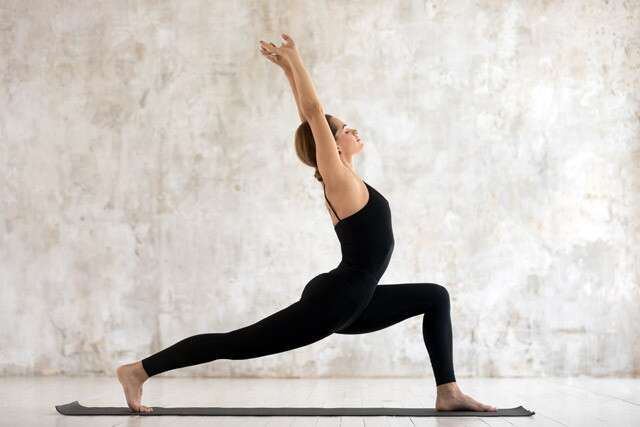 Image: Shutterstock
This asana is considered to be one of the most graceful postures in yoga, and it adds a whole lot of beauty to the workout. Chhabria lists down the following steps to perform Virabhadrasana.
Pro Tip: It can be difficult to keep the back heel grounded, so you could position yourself near a wall and concentrate on keeping it grounded by pushing it against the wall.
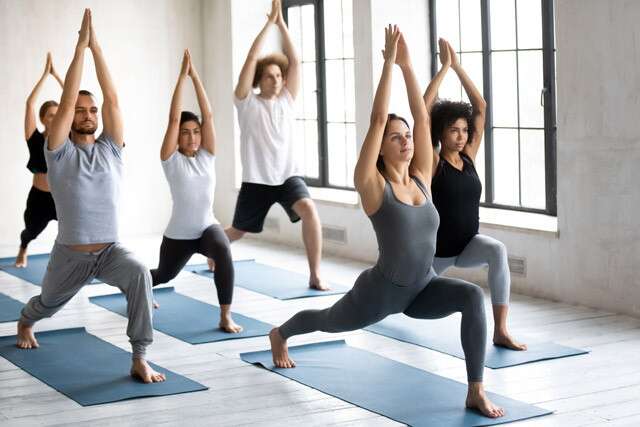 Image: Shutterstock
This asana strengthens back muscles, butts and hamstrings and helps with improving balance. Lifting your torso and arms up helps build strength in the arms, shoulders, and back. Strengthens biceps and triceps and helps open and create strength and stability in the shoulder joints. This asana tones the abdomen and outer hips. Opens the hip flexors and strengthens the hip extensors. Engages the deep core muscles, which helps create stability and improve balance. Can help alleviate pain caused by sciatica.
Pro Tip: Vrikshasana, which is also known as the tree pose, helps prepare for Virabhadrasana I.
 Image: Shutterstock
Pro Tip: Balasana and Adho Mukha Svanasana are the follow up poses.
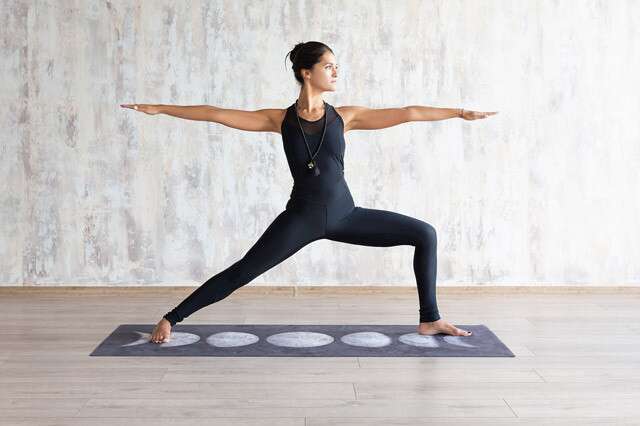 Image: Shutterstock
This asana is performed in the standing posture similar to the previous version. It aids in enhancing strength, stability, and concentration. Here is the step-by-step instruction to perform this asana.
Pro Tip: This asana is considered best when yogi practiced early in the morning.
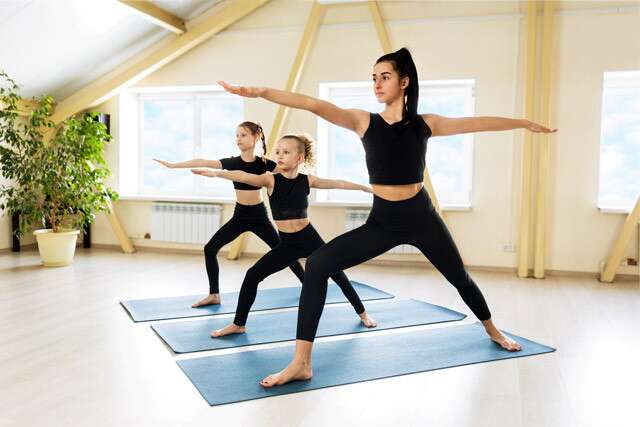 Image: Shutterstock
Pro Tip: The warrior pose expands the chest and shoulders, thereby improving breathing capacity.
 Image: Shutterstock
Pro Tip: BaddhaKonasana and Vrikshasana are the preparatory poses and Uttitha Trikonasana and Parsvottanasana are the follow-up poses.
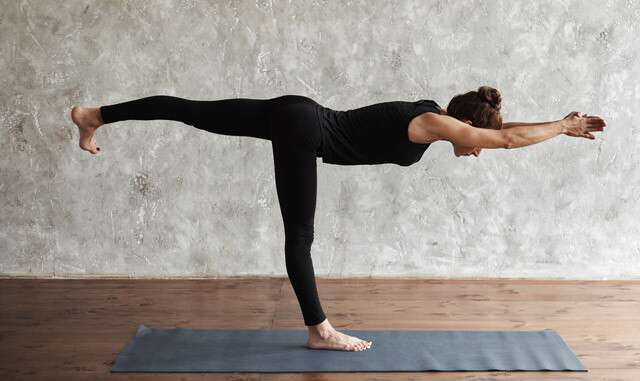 Image: Shutterstock
Virabhadrasana III prepares one for advanced yoga postures. It enables a strong foundation and confidence to practice strenuous standing yoga postures. This dynamic standing posture creates stability throughout the body by integrating all the core muscles. Yoga expert’s practice guide helps one to practice the asana safely.
Pro Tip: It’s always best to practice under the guidance of a yoga instructor rather than by watching videos.
 Image: Shutterstock
Pro Tip: Uttkatasana, Vrikshasana, Urdhva Hastotanasana and ArdhaChandrasana – These poses before performing the warrior pose 3 are advised to prepare the body for practice. Tadasana, Uttanasana and Adho Mukha Svanasana are the follow-up poses, to be performed after the Virabhadrasana 3 Pose.
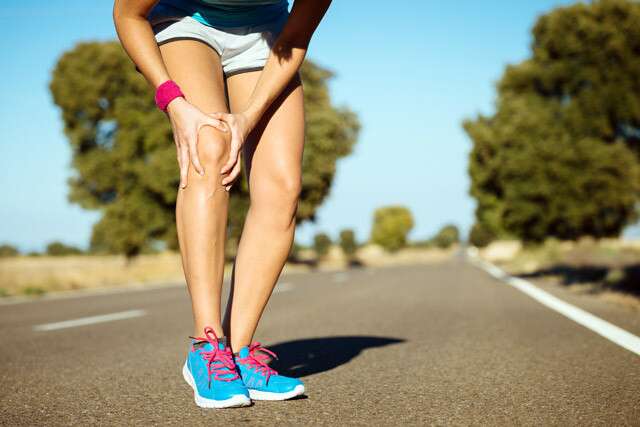 Image: Shutterstock
Pro Tip: Using props such as chairs, against a wall or using blocks could make it less complicated and easy to begin with.
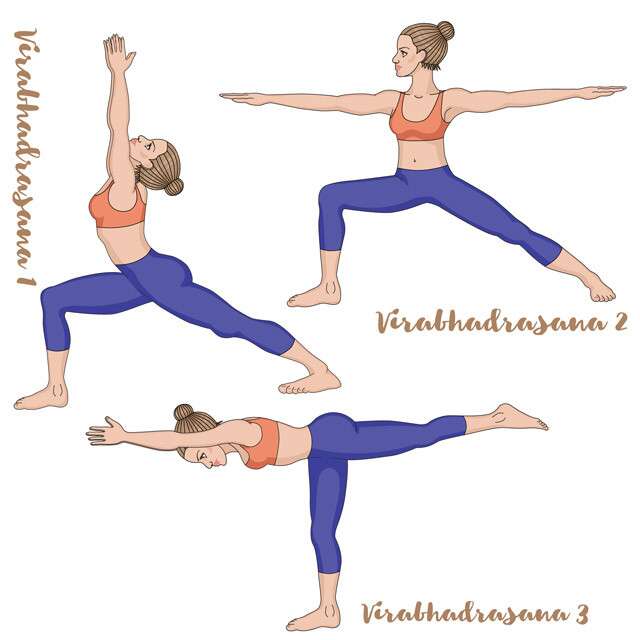 Image: Shutterstock
Also Read: Know All About The Eagle Pose Garudasana
“Although foundational in nature, what makes Virabhadrasana series unique, powerful, and a bit complex at the same time, is the fact that you are required to balance simultaneous movements in different directions,” feels Suman Chhabria, Certified Yoga instructor and founder of Anaya who says this act of balancing directly works on creating stillness in the mind, building focus, power, and stability, thereby improving health at a holistic level.
“Also, it teaches us to develop a sense of balance and become more aware of body positioning,” she says. In Sanskrit, Vira = Hero or Warrior or Vigorous and Courageous and Bhadra = good or auspicious. Named after the fierce Warrior Virabhadra, as per the Hindu Mythology, the warrior Virabhadra was created by Lord Shiva, symbolizing our inner ability to overcome ego and ignorance.
VIRABHADRASANA I
Benefits Of Virabhadrasana I
Contraindications Of Virabhadrasana I
VIRABHADRASANA II
Benefits Of Virabhadrasana II
Contraindications Of Virabhadrasana II
Virabhadrasana III
Benefits Of Virabhadrasana III
Contraindications of Virabhadrasana III
FAQs:
VIRABHADRASANA I
This asana is considered to be one of the most graceful postures in yoga, and it adds a whole lot of beauty to the workout. Chhabria lists down the following steps to perform Virabhadrasana.
- Stand straight with your legs wide apart.
- Turn one foot by 90 degrees outwards and the other foot in by about 15 degrees.
- Make sure that the heel of the foot that is tuned 15 degrees, is aligned to the center of the other foot.
- Place your hands on your hips and turn your shoulders, chest and pelvis forward. Torso facing the front of the mat.
- While inhaling, bring the arms from the sides over your head. Keep your palms in a namaste pose over your head.
- Bring your shoulders down the back while keeping the back leg firm.
- Bend the back knee and exhale deeply keeping it directly in line with the other ankle.
- The thigh should be parallel to the ground. Make sure the bent knee does not pass the ankle and the big toe is visible.
- Arch your back and drop your head back, gaze upwards towards the namaste pose.
- Ground down the front foot making sure the outer edge of the foot is pressed firmly on the mat. This will allow the weight to shift backward.
- Draw your tailbone toward the pelvis and engage your abdomen.
- Retain the pose for 10-20 seconds.
- Inhale and straighten your back leg; then exhale and release your arms, stepping your feet together. Change sides and repeat the same procedure for maximum benefits.
Pro Tip: It can be difficult to keep the back heel grounded, so you could position yourself near a wall and concentrate on keeping it grounded by pushing it against the wall.
Benefits Of Virabhadrasana I
This asana strengthens back muscles, butts and hamstrings and helps with improving balance. Lifting your torso and arms up helps build strength in the arms, shoulders, and back. Strengthens biceps and triceps and helps open and create strength and stability in the shoulder joints. This asana tones the abdomen and outer hips. Opens the hip flexors and strengthens the hip extensors. Engages the deep core muscles, which helps create stability and improve balance. Can help alleviate pain caused by sciatica.
Pro Tip: Vrikshasana, which is also known as the tree pose, helps prepare for Virabhadrasana I.
Contraindications Of Virabhadrasana I
Watch out for these warning signs before you try this asana.
- High blood pressure patients should avoid this posture.
- If you have neck problems, keep your head in a neutral position and don’t up at your thumbs.
- People with heart problems should avoid this posture.
- If you have knee pain or knee injury avoids this posture.
Pro Tip: Balasana and Adho Mukha Svanasana are the follow up poses.
VIRABHADRASANA II
This asana is performed in the standing posture similar to the previous version. It aids in enhancing strength, stability, and concentration. Here is the step-by-step instruction to perform this asana.
- Stand with your legs wide apart and turn your right foot out by 90 degrees and left foot in by about 15 degrees.
- Make sure that the heel of the right foot is aligned to the center of the left foot.
- Inhale and lift both arms sideways to shoulder height with your palms facing upwards. Arms parallel to the ground.
- Exhale and bend your right knee. The ankle and corresponding knee should be aligned in one line.
- Make sure the knee does not go beyond the ankle.
- Turn your head and focus on your right middle finger.
- As you settle down in the yoga posture, stretch your arms further.
- Make a gentle effort to push your pelvis down.
- Hold this posture with confidence.
- Inhale and unbend your right knee and slowly come up.
- Exhale, bring your hands down from the sides.
- Repeat the yoga posture for the other leg and side.
Pro Tip: This asana is considered best when yogi practiced early in the morning.
Benefits Of Virabhadrasana II
- Strengthens your shoulders, arms, legs, ankles and back.
- Opens your hips, chest and lungs.
- Improves focus, balance and stability.
- Encourages good circulation and respiration.
- Stretches your arms, legs, shoulders, neck, belly, groins and ankles.
- Energizes the entire body.
- Stimulates your abdominal organs
Pro Tip: The warrior pose expands the chest and shoulders, thereby improving breathing capacity.
Contraindications Of Virabhadrasana II
The following precautions should be taken while doing Virabhadrasana II.
- High blood pressure patients should avoid this posture.
- Virabhadrasana especially benefits pregnant ladies in their second and third trimesters provided they have been practicing yoga regularly. Practice Virabhadrasana while standing close to a wall, so you can support yourself if required. However, do consult your doctor before doing this yoga posture.
- If you have knee pain or arthritis, use some support at the knee to hold this yoga posture.
Pro Tip: BaddhaKonasana and Vrikshasana are the preparatory poses and Uttitha Trikonasana and Parsvottanasana are the follow-up poses.
Virabhadrasana III
Virabhadrasana III prepares one for advanced yoga postures. It enables a strong foundation and confidence to practice strenuous standing yoga postures. This dynamic standing posture creates stability throughout the body by integrating all the core muscles. Yoga expert’s practice guide helps one to practice the asana safely.
- Stand upright with feet together and place your hands on the waist.
- Inhale slowly and shift your body weight to the leg that you would like to place firmly on the ground.
- Lift your other leg and simultaneously bend forward.
- Make sure your upper body and the leg are parallel to the ground. You can now bring your hands together and do a namaste pose with your hands.
- Stay in this pose for three minutes, to begin with, and up to five minutes when you start mastering this pose.
- Practice your breathing exercise too while retaining the position.
- You can do the same pose trying the other leg, provided you are confident of balancing.
Pro Tip: It’s always best to practice under the guidance of a yoga instructor rather than by watching videos.
Benefits Of Virabhadrasana III
- Strengthens your back muscles, thighs, knees, ankles and legs.
- The balancing act improves coordination and focus.
- The core muscles are benefitted from this asana.
- Hip muscle, arms and abdomen are toned
- Relieves stiffness in the neck, shoulders and back
- Reduces stubborn fat from hips.
Pro Tip: Uttkatasana, Vrikshasana, Urdhva Hastotanasana and ArdhaChandrasana – These poses before performing the warrior pose 3 are advised to prepare the body for practice. Tadasana, Uttanasana and Adho Mukha Svanasana are the follow-up poses, to be performed after the Virabhadrasana 3 Pose.
Contraindications of Virabhadrasana III
- High blood pressure patients should avoid this posture.
- If you have knee pain, heart problems, neck or shoulder pain, avoid this posture.
- If you suffer from spinal ailments avoid this posture.
Pro Tip: Using props such as chairs, against a wall or using blocks could make it less complicated and easy to begin with.
FAQs:
Q. Is Warrior Asana A Beginner Pose?
A. Balancing in this pose can be very challenging for beginners. Hence, one could get started by using props such as chairs or blocks.Q. How Long Should You Hold The Warrior 3 Pose?
A. You can start by maintaining the pose for 10 seconds on each side, repeating 5 times. Once you master the pose, you can aim to hold the pose for 2 minutes on each side.Q. When Should You Do Virabhadrasana?
A. All yoga positions are best suited for the early morning. That implies to this asana as well. It is best practiced early in the morning. If mornings are difficult, then evenings with a 3–5-hour gap after a meal are ideal.Also Read: Know All About The Eagle Pose Garudasana
Body Mass Index (BMI) Calculator
Next Story