Bridge Pose (Setu Bandha Sarvangasana): How To Practice, Benefits And Precautions
Whether you have digestive issues or suffering from a serious disease like thyroid, practising the bridge pose can help you in more ways than one. Here's everything you need to know about it.
Written by Arushi Bidhuri|Updated : May 31, 2022 11:54 AM IST
Bridge pose, also known as Setu Bandha Sarvangasana, is one of the first postures that beginners are recommended to include in their regimen. In Sanskrit, setu means "bridge," sarva means "all," and anga means "limb." In other words, Setu Bandha Sarvangasana uses all of your limbs to construct a bridge with your body. Practising this pose allows you to pay attention to and care for your body and its movements. It awakens the senses, soothes the mind and rejuvenates the body. It is performed to strengthen the legs and hips, open the heart and massage the spine.
How To Perform Bridge Pose?
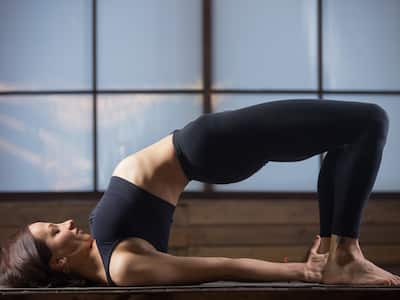
Here's a step-by-step guide to practising the bridge pose:
Lie on your back on a mat, with your knees bent and feet on the floor.
Firmly press your feet and arms into the ground. Lift your hips toward the ceiling while exhaling.
Tuck your shoulder blades underneath you and interlace your hands while pressing down on them as you elevate your body.
Hold your buttocks off the floor by drawing your tailbone toward your pubic bone. Squeeze your glutes while you do this.
Straighten your arms and press your forearms into the mat as much as possible. Reach for your heels with your knuckles.
Keep your thighs and feet parallel don't let your knees sink together or slide to the outer borders of your feet.
Press your weight evenly across all four corners of both feet. Lengthen your tailbone toward the backs of your knees.
Hold the position for up to one minute. Unclasp your hands and set them palms down alongside your body to release.
Lift your hips even higher for a few breaths near the end if possible. Feel the stretch in your hip flexors and the front of your body.
Now carefully drop your hips, vertebra by vertebra, until your tailbone reaches the floor. As you finish the pose, take a few deep breaths.
You can try a few variations when it comes to performing the bridge pose:
Place a block or bolster under your lower back immediately above your tailbone if you're having problems keeping your hips elevated.
Keep your hands alongside your body with your palms pressed into the mat rather than clasping them beneath your torso if your shoulders are really tight.
Don’t Miss Out on the Latest Updates. Subscribe to Our Newsletter Today!
Subscribe Now
Enroll for our free updates
Thank You for Subscribing
Thanks for Updating Your Information
By clicking “Accept All Cookies”, you agree to the storing of cookies on your device to enhance site navigation, analyze site usage, and assist in our marketing efforts. Cookie Policy.