Warrior pose 3: How To Practice, Precautions And Benefits Of Virabhadrasana III
Warrior pose 3 or Virabhadrasana III is a variation of the warrior pose that offers a plethora of health benefits. Here's everything you need to know.
Written by Arushi Bidhuri|Updated : August 16, 2022 5:01 PM IST
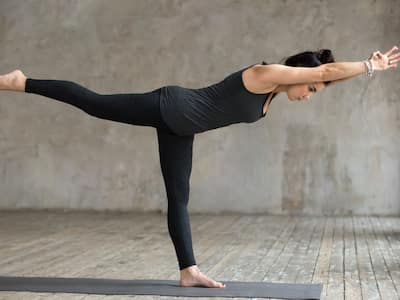
Yoga is a holistic practice that can work wonders for you if you practice regularly. Warrior pose 3 is one of the best yoga asanas if you want to improve balance and strengthen your body. This pose involves balancing on one leg, torso, and arms while your other leg stays parallel to the ground. It is one of the best energizing poses that can help you build lower body and core strength. Not only does it physically benefit you, but warrior pose 3 also offers mental health benefits.
It is also a good yoga pose that helps you build a stronger foundation and confidence to perform more difficult and challenging yoga poses. Here's everything you need to know about the pose.
Health Benefits Of Warrior Pose 3
Here are the health benefits of the warrior pose 3 that you should know about:
Here is a step-by-step guide to performing warrior pose 3:
Start with your right foot forward in a high lunge.
Put your hands in a prayer position with your palms touching in front of your chest (Anjali Mudra).
You can engage your lower abdominals by drawing in your lower abdomen from navel to spine after gently bringing together and lifting your pelvic floor muscles. Mula and Uddiyana Bandhas are therefore activated for balance and lightness.
Fold forward from the hips, bringing your upper body to a 45-degree angle with the floor as you exhale.
Just in front of your mat, pay attention to a spot on the floor. Your Drishti, or location of gazing, is here.
Take a deep breath, plant your front foot firmly, and start to lean forward. Start removing the rear foot from the ground.
After taking a breath out, bring your body and left leg parallel to the floor by starting to straighten the standing leg.
To maintain the leg engaged without locking the knee, raise the muscles in your right thigh.
In order to maintain the raised leg active, keep the foot that is being raised flexible with the toes pointed down toward the floor.
If you can, stay in the position for five full breaths. Then, bend your front knee, softly lower your rear leg, and come back to a high lunge.
From here, take a few breaths in Mountain position, Tadasana, or Downward Dog before stepping your left foot forward into High Lunge for the next side.
Modifications/Variations
Beginners should try to pose against the wall at first. You can also hold on to a chair instead of the wall if that seems easier.
People who are up for a challenge and have mastered the basic pose can bring their arms to a reverse Namaste position behind your back and brings their arms to either side of your body.
You may like to read
Precautions To Take
Avoid practising the yoga pose if you have:
high blood pressure
balance difficulties
hip, knee, ankle, back or shoulder injury
pain in any part of the body
Also, avoid doing this pose if you are pregnant. Do not perform this pose without consulting your doctor, especially if you have an underlying disease.
Don’t Miss Out on the Latest Updates. Subscribe to Our Newsletter Today!
Subscribe Now
Enroll for our free updates
Thank You for Subscribing
Thanks for Updating Your Information
By clicking “Accept All Cookies”, you agree to the storing of cookies on your device to enhance site navigation, analyze site usage, and assist in our marketing efforts. Cookie Policy.