Extended Side Angle Pose
Find length in your side body, from your heel to your fingertips with Extended Side Angle Pose.
Heading out the door? Read this article on the new Outside+ app available now on iOS devices for members! Download the app.
Utthita Parsvakonasana (Extended Side Angle Pose) is all about the extension: in your arms, your legs, and your stance. In this challenging and invigorating posture, you’ll feel a stretch from the outer heel of your foot to your fingertips. Your oblique muscles are worked while the rib cage opens, encouraging you to breathe ever deeper.
Extended Side Angle Pose invites both presence and engagement. “Yoga teaches you to align your body to be vertical and upright,” says certified yoga therapist Nikki Costello. “But it’s equally important to expand horizontally so that your awareness can move from your inner space toward universal space. A simple side stretch expands your sense of self. When you open horizontally, you feel more spacious, and the inside and outside—the Self and the other—no longer feel so separate.”
Section dividerSanskrit
Utthita Parsvakonasana (oo-TEE-tah Parsh-vah-cone-AHS-anna)
utthita = extended
parsva = side, flank
kona = angle
Section dividerExtended Side Angle Pose basics
Pose Type: Standing Balance
Targets: Lower Body
Benefits: Extended Side Angle Pose improves balance, boosts energy and fights fatigue; it may help build confidence and empowerment. It improves posture and counteracts the effects of prolonged sitting and doing computer work.
Other Extended Side Angle perks:
- Strengthens your core, including your abdominals and back muscles
- Stretches and strengthens around your shoulder joints
- Strengthens the front of your hips (hip flexor), shins, buttocks (glutes), inner thighs (adductor and groin), and ankle.
How to
- Start in Tadasana (Mountain Pose). Jump your legs about 4 feet apart. Extend your arms into a T position, with your palms facing down; reach out through the fingertips as if your arms were being pulled in opposite directions.
- Turn your left foot out to 90 degrees, and turn your right foot slightly inward. Lift through your spine, keeping the sides of your torso equally long.
- Press your right outer foot and heel to the floor as you bend your left knee toward a 90-degree angle with your left thigh parallel to the floor. Adjust your stance to establish a strong foundation.
- Lean toward your left knee, hinging at the hips to bring your left arm own toward the floor. You may place your left fingertips to the ground or on a block. Move your left armpit close to the outer left knee so your arm and shin are parallel.
- Reach your right arm up over your right ear, palm facing the floor. Turn your chest toward your raised arm and press the right hip toward the floor to create a straight line from your right ankle to you
- Turn your head to look past your right thumb. Breathe freely in the pose. Stay for 30 to 60 seconds.
- Inhale reach up then bring your torso up and straighten the left leg. Switch sides.
Beginner’s tips
- Press down through all four corners of both feet to create steadiness and balance.
- Pull your shoulder blades in toward your spine and keep your chest open as you turn your torso upward.
- Keep extending: When you reach your top arm overhead, press down through your foot, and reach even further through your arm and hand.
- If it is not comfortable to turn your gaze upward, instead look straight ahead or drop your gaze to your right foot.
Deepen the pose
- If you find your weight shifting into your front foot, lift the ball of the front foot off the floor, anchor through your heel, then lower the ball of your front foot onto the floor.
- Press the head of your back femur deep into its socket, lift your inner back groin deep into your leg, and allow the hip to press downward, creating a straighter line from fingers to ankle.
- To deepen the pose, take a half or full bind with the top arm. If it doesn’t compromise your alignment, bring the arm down, bend your elbow and reach it behind your back for a half bind. If it is comfortable for you, reach the lower arm under and behind the front thigh and reach your bottom hand for your top wrist.
Be mindful!
It can be easy to focus all of your attention on your top arm and side. When this happens, your bottom side tends to collapse, with your ear close to her head. If you experience this, press down through the bottom hand and actively shrug your shoulder away from your ear. Also, if your bottom ribs feel compressed, stretch to lengthen through that entire side of your body.
Section dividerTeacher tips
- This pose is all about space. Lengthen along both sides of your body to create space for the torso to open. Prepare for this opening by pressing your supporting hand to the floor or a block and fully extending your upper arm. You should feel an opening across your collarbones and chest.
- As you bend one leg, extend the other, keeping your knees firm. These dual actions lengthen the inner thighs and stretch the gluteal muscles while strengthening the outer leg muscles and stabilizing the hips.
Variations
Extended Side Angle Pose with forearm on thigh
If you can’t easily touch the fingertips of your lower hand to the floor, rest your forearm on the top of the bent-knee thigh. Press down into the thigh with your forearm to prevent your bottom shoulder from crowding your neck.
Extended Side Angle Pose with a block
If you can’t easily touch the fingertips of your lower hand to the floor, rest your hand on a block at any height. The block can be on the inside or the outside of your foot. Bring your top arm straight up toward the ceiling or overhead.
Extended Side Angle Pose in a chair
Sit in a chair and carefully turn your hips and thighs into position as best you can. Bring your bottom hand or forearm onto the thigh on your bent knee side. Reach your other arm up and over into a side stretch or any other position, including bending your top elbow and reaching your arm behind your back to open your shoulder. You can look up if that’s comfortable for your neck.
Section dividerWhy we love this pose
“When a teacher first cued me to glide my arm across my chest and pull back my shoulder blades to keep my arm above my ear, everything clicked,” says Kyle Houseworth, Yoga Journal‘s assistant editor. “I felt myself locking into the pose and breathing through the deep stretch in my side body. Extended Side Angle Pose is a reminder that our practices are fluid yet firm, playful yet particular—we flow through the movements while remaining strong in the postures. I imagine myself strumming a guitar while persevering through discomfort. It brings a smile and a deep breath, and I couldn’t ask for anything more in a pose.”
Section dividerPreparatory and counter poses
Since Extended Side Angle engages nearly the entire body, you want to first incorporate poses into your practice that address full-body movement, including Surya Namaskar A. Also emphasize poses that lengthen your side body and stretch your hamstrings, hip flexors, and quadriceps.
Preparatory poses
Virabhadrasana II (Warrior II)
Prasarita Padottanasana (Wide-Legged Standing Forward Bend)
Counter Poses
Uttanasana (Standing Forward Bend)
Utthita Trikonasana (Revolved Triangle)
Ardha Chandrasana (Half Moon Pose)
Section dividerAnatomy
Imagine that in a Warrior pose, you are taking an exaggerated step in preparation to throw a spear. Extended Side Angle, or Utthita Parsvokasana, would be the follow-through of throwing the spear, explains Ray Long, MD, a board-certified orthopedic surgeon and yoga instructor.
In the drawings below, pink muscles are stretching and blue muscles are contracting. The shade of the color represents the force of the stretch and the force of contraction. Darker = stronger.
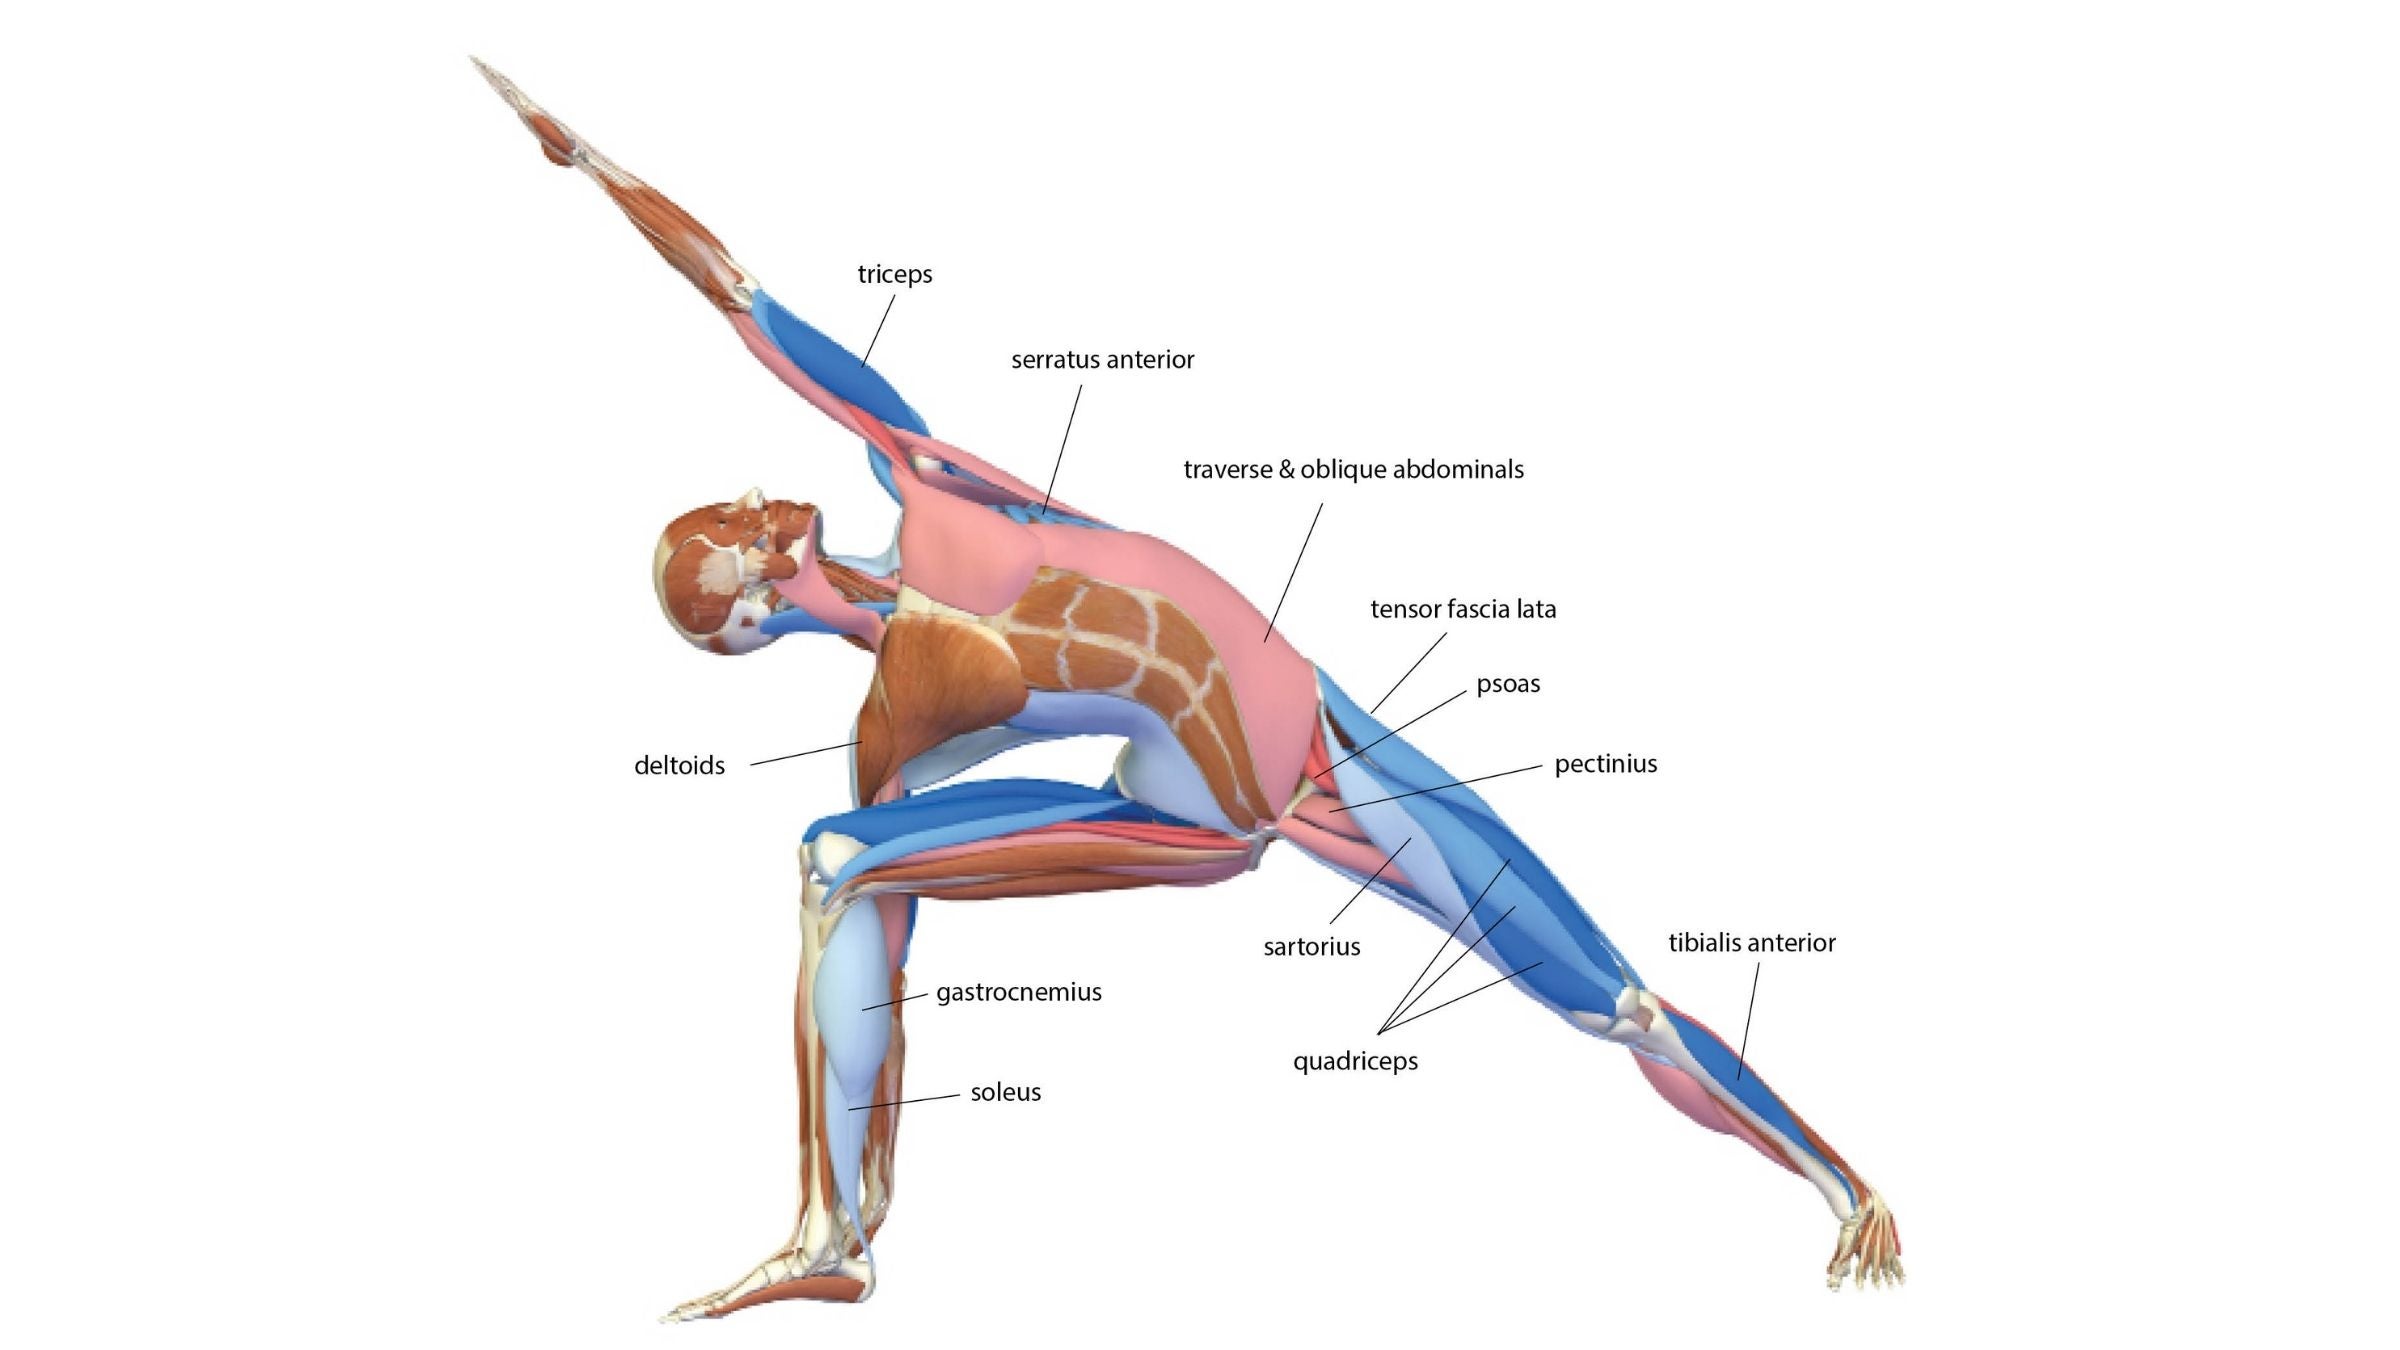
Combining the action of the shoulder and arm with anchoring the back foot into the mat creates a stretch of the entire side of the body, including the upper-side back muscles, the front-leg gluteals, the front of the pelvis (including the back-leg adductors), and the calf muscles of the back leg.
Straighten the back knee by activating the quadriceps and the tensor fascia latae muscle of the thigh. Then try to draw the top of the foot toward the shin by engaging the tibialis anterior muscle to anchor the heel.
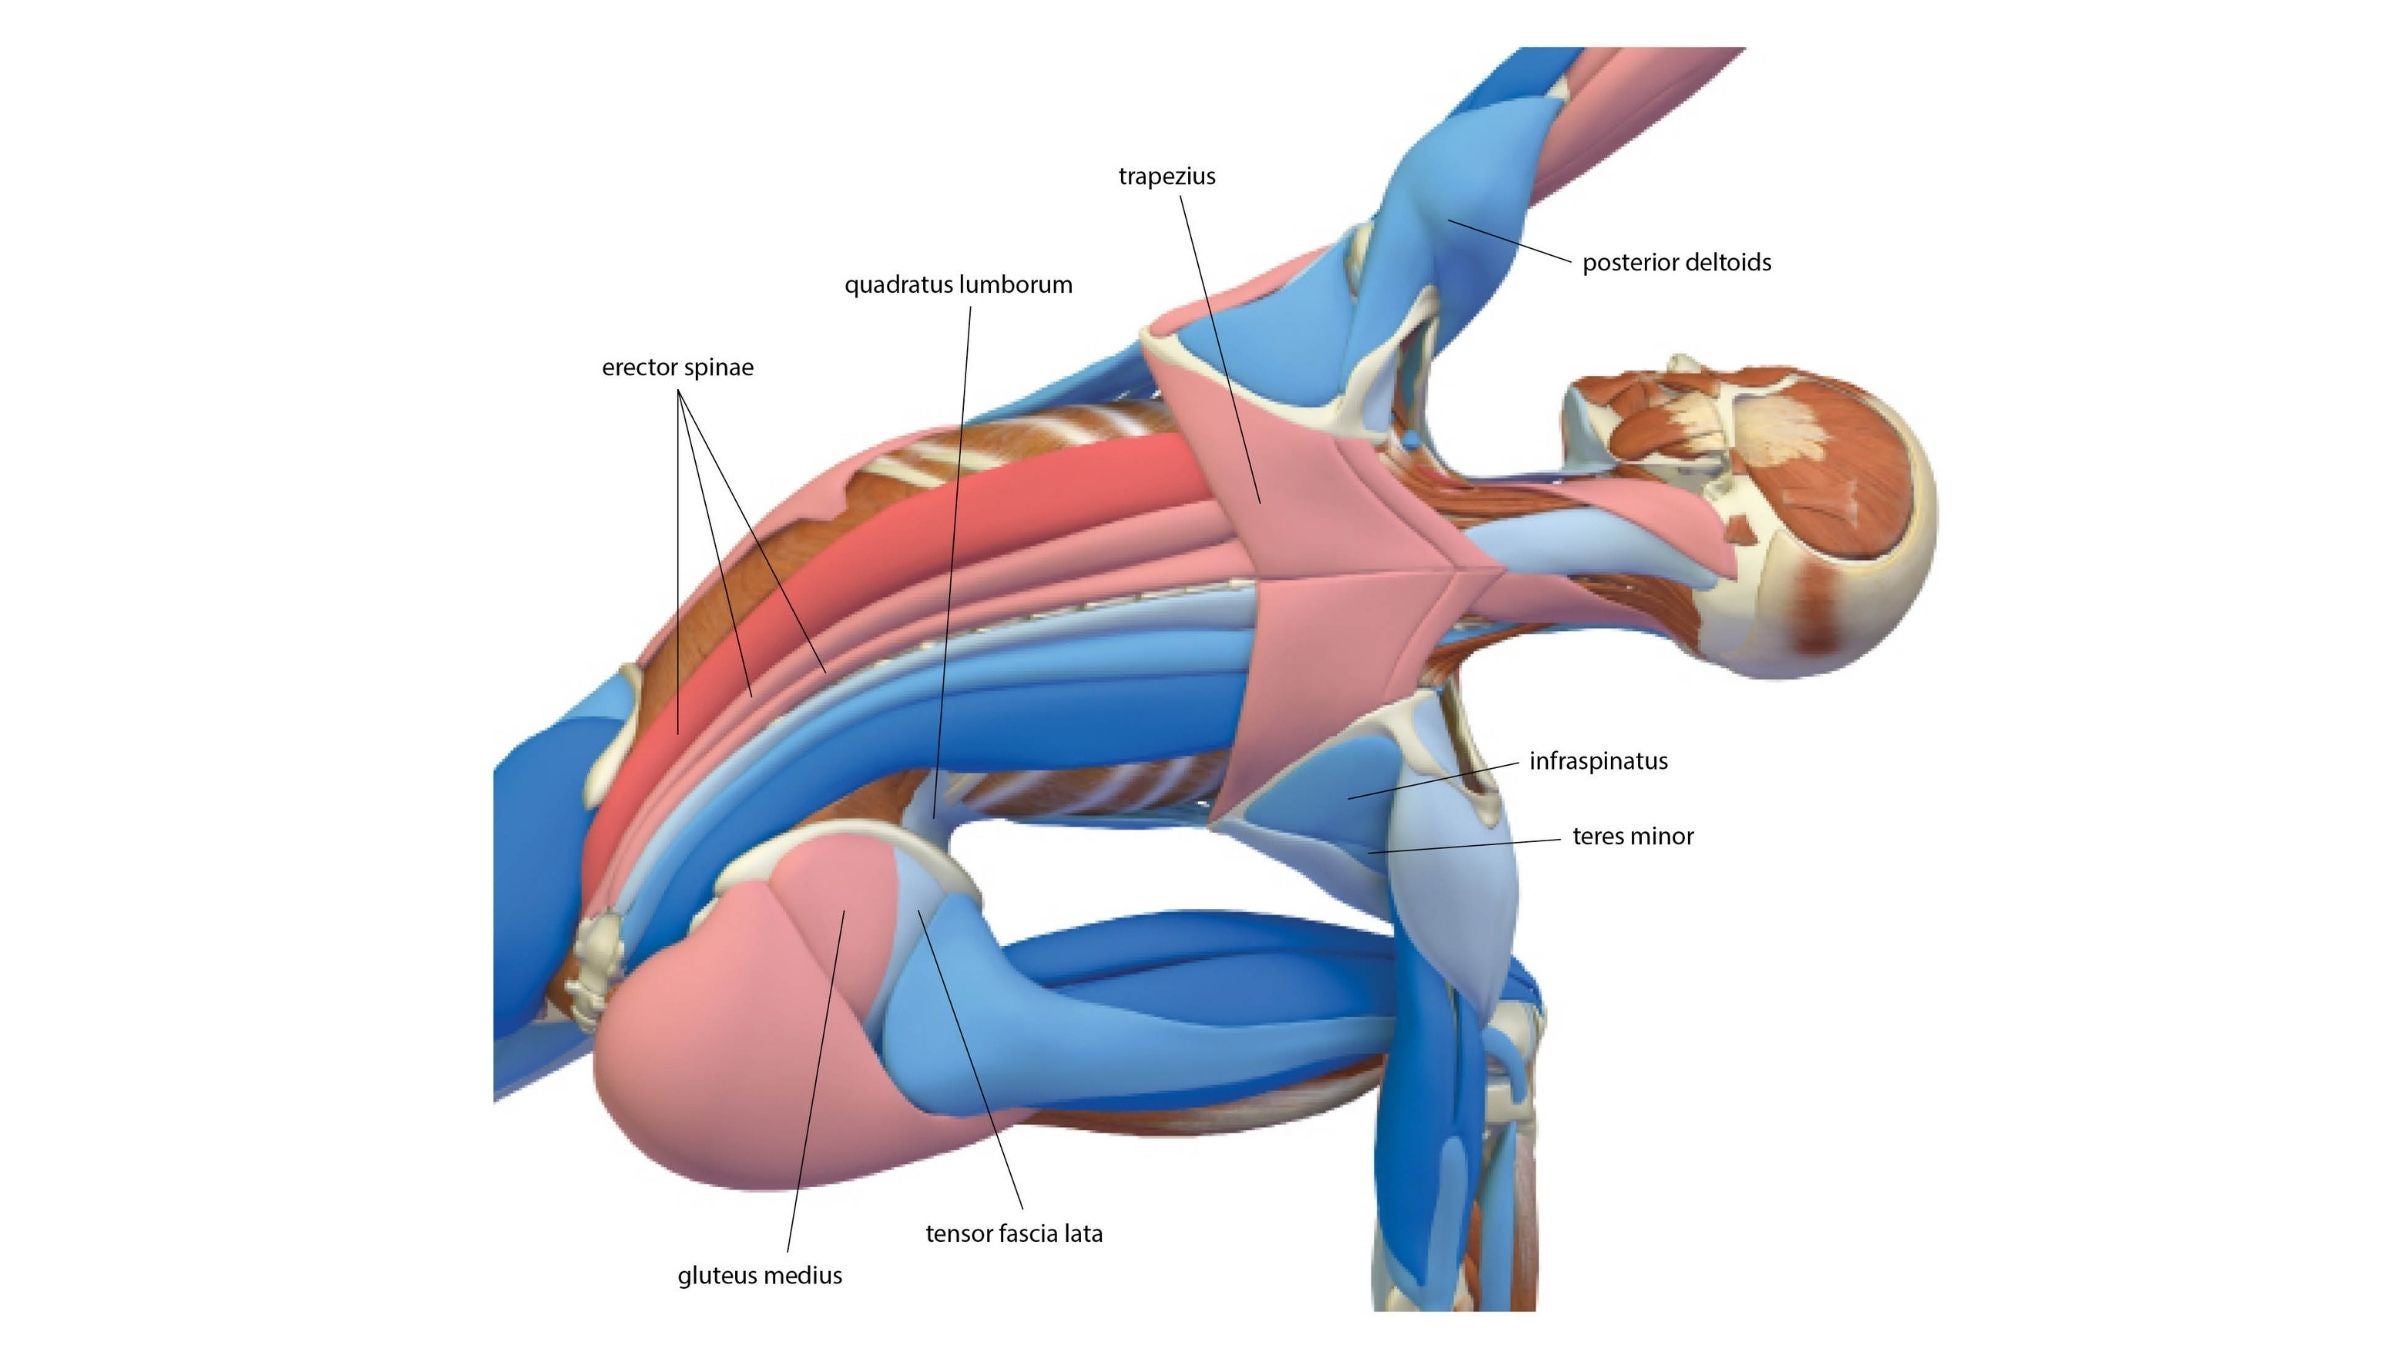
The lower-side abdominal oblique and transverse muscles draw the trunk toward the bent leg, stretching the same muscles on the upper side of the trunk. On the lower side, the muscles along the spine and those in the lower back (the erector spinae and quadratus lumborum) bend the trunk to the side, stretching the corresponding muscles on the upper side.
Press the bottom hand onto the floor or a block to contract the serratus anterior. This straightens the arm and draws the same-side shoulder blade away from the midline. The muscles over the shoulder blades, the infraspinatus and teres minor, turn the shoulder and arm out. The lower section of the trapezius draws the shoulders away from the ears, freeing the neck.
Press the outer knee into the arm to engage the gluteus medius and tensor fascia lata. Notice how this counteracts the tendency of the pelvis to move outward and the knee to drift inward. Connecting the arm and leg in this manner creates leverage and combines with the action of the back-leg gluteus maximus to open the front of the pelvis.
Excerpted with permission from The Key Poses of Yoga and Anatomy for Vinyasa Flow and Standing Poses by Ray Long.
Put Extended Triangle Pose into practice
Section divider
About our contributors
Teacher and model Natasha Rizopoulos is a senior teacher at Down Under Yoga in Boston, where she offers classes and leads 200- and 300-hour teacher trainings. A dedicated Ashtanga practitioner for many years, she became equally as captivated by the precision of the Iyengar system. These two traditions inform her teaching and her dynamic, anatomy-based vinyasa system Align Your Flow. For more information, visit natasharizopoulos.com.
Ray Long is an orthopedic surgeon and the founder of Bandha Yoga, a popular series of yoga anatomy books, and the Daily Bandha, which provides tips and techniques for teaching and practicing safe alignment. Ray graduated from the University of Michigan Medical School and pursued post-graduate training at Cornell University, McGill University, the University of Montreal, and the Florida Orthopedic Institute. He has studied hatha yoga for over 20 years, training extensively with B.K.S. Iyengar and other leading yoga masters, and teaches anatomy workshops at yoga studios around the country.