Heading out the door? Read this article on the new Outside+ app available now on iOS devices for members! Download the app.
Parivrtta Trikonasana (Revolved Triangle Pose) provides a powerful opportunity to build concentration and awareness. This twist requires you to stay in the moment, which is a valuable antidote for a wandering mind. And by giving yourself over to the more physically difficult elements of the posture, you can improve your practice of ekagrata, or one-pointed focus. Parivrtta Trikonasana is a strong counter-pose to Utthita Trikonasana (Extended Triangle Pose), and serves to improve balance, and build stability, among many other benefits.
In Revolved Triangle, it’s extremely important not to over-twist the neck, and instead focus on the muscles in the middle and upper back. “The tendency for most of us is to twist where it’s easy and avoid twisting where it’s not,” explains Yoga Journal contributor Natasha Rizopoulos. “This usually means that you will overwork the neck, which is relatively mobile, and underwork the middle and upper back, the parts of the spine that in many people are about as malleable and responsive as a block of cement.”
When you overwork an area, you run the risk of making it vulnerable to injury. If you can keep integrity in the rest of your body rather than falling into the trap of over-twisting the neck, Parivrtta Trikonasana can help work a needed and undervalued area of the body: the thoracic spine. And, working the muscles in an area that you perhaps typically forget can create a valuable opportunity to enhance the presence of the mind in relation to the body.
Revolved Triangle basics
Sanskrit: Parivrtta Trikonasana (par-ee-vrit-tah trik-cone-AHS-anna)
Pose type: Twist
Targets: Full body
Why We Love It: “When I was in yoga teacher training, each weekend we would workshop various poses, and our trainer would call on one of us to demonstrate,” says Yoga Journal senior editor Renee Schettler. “One day I was called to demo Revolved Triangle Pose. We hadn’t studied it yet, and though I had been practicing yoga for years, I hadn’t committed many Sanskrit names to memory. I had no idea what to do. I hesitated, uncertain, and then took a long breath. Then, without thinking, I settled into the posture.
Where that knowing came from, I have no explanation. I think that sums up my experience with yoga at large and this posture in particular. The less I try to think my way through the posture and the more I feel my way through it, the easier and more aligned things turn out. That’s not to say Revolved Triangle is easy. It’s not! And that’s what I appreciate about it. The challenge is to come into the posture seeking to have strong extended legs, straight back, hips not swaying off to one side, and back not arching, yet without getting so lost in your thoughts that you forget what the pose could do for you should you let yourself pause in it. Less thinking. More feeling.”
Pose benefits
Revolved Triangle strengthens and stretches the legs, opens the chest to improve breathing, relieves mild back pain, and improves your sense of balance.
Revolved Triangle Pose: Step-by-step instructions
- Begin in Tadasana (Mountain Pose) at the top of your mat.
- Step or lightly jump your feet 3 to 4 feet apart. Raise your arms parallel to the floor and reach them actively to the sides, shoulder blades wide, palms down.
- Turn your left foot in slightly and your right foot out to 90 degrees. Align your right heel with your left heel. Firm your thighs and turn your right thigh outward, so the center of your right kneecap is in line with the center of the right ankle.
- Exhale and extend your torso to the right, directly over the plane of your right leg, bending from the hip joint, not the waist. Anchor this movement by strengthening your left leg and pressing your outer heel firmly to the floor. Rotate your torso to the left, keeping the left and right sides of your torso equally long. Let your left hip come slightly forward and lengthen your tailbone toward the back heel.
- Rest your right hand on your shin or ankle or the floor outside your right foot—whatever is possible without distorting the sides of your torso. Stretch your left arm toward the ceiling, in line with the tops of your shoulders. Keep your head in a neutral position or turn it to the left, eyes gazing softly at your left thumb.
- Stay in this pose for 30 to 60 seconds. Inhale to come up, strongly pressing your back heel into the floor and reaching your top arm toward the ceiling. Reverse your e feet and repeat for the same length of time on the other side.
Beginner’s tips
- This pose is slightly easier with a narrower stance. Beginners should also bring their hand to the inner foot, whether on the floor or on a support like a block or folding chair.
- To keep the back of your body even, pretend that you are pressing your head, shoulders, and buttocks against a wall.
- Try to keep your arms in one long line, from the floor to the ceiling.
- If you feel unsteady in the pose, bring your head, neck, and gaze, or your drishti, to a neutral position, pointing in the same direction as your hips instead of looking up.
Teaching Parivrtta Trikonasana
These tips will help protect your students from injury and help them have the best experience of the pose:
- One of the most common problems in this pose is the inability to keep the back heel grounded, which makes the pose very unstable. There are various ways to help students deal with the back heel. First, of course, you can advise students to accept the situation and work diligently to press through the heel (and open the back-leg groin) even though it’s off the floor. Second, you can advise students to perform the pose with their back heels wedged against a wall, which gives them something to push into. Or finally, they can raise the back heel on a lift and, over time, work to gradually lower the lift until the heel stays on the floor.
- When students bring their bottom hand to the outside of the forward leg, advise them to press the forearm firmly against the outer shin. This pressure of arm-against-leg will help their torsos rotate more deeply into the pose.
- Remind your students to focus on small movements as they expand in this pose: They can attempt to reach their hands away from each other, to direct their gaze gently up, to tighten their abdominal muscles, and to expand outward from the chest.
- Breath can help students retain stability in this pose. As they inhale, they can lengthen the spine to create space. As they exhale, they can move further into the twist, while maintaining integrity.
Variation: Revolved Triangle Pose with a block
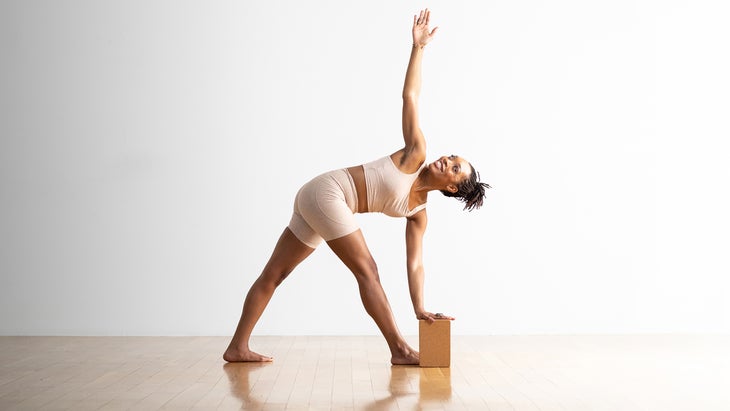
Follow the directions above but, instead of bringing your hand to the floor, bring your hand to a block set at any height. If you do not have a block, you can bring your hand up higher on your shin rather than on the floor.
Variation: Revolved Triangle Pose with a chair
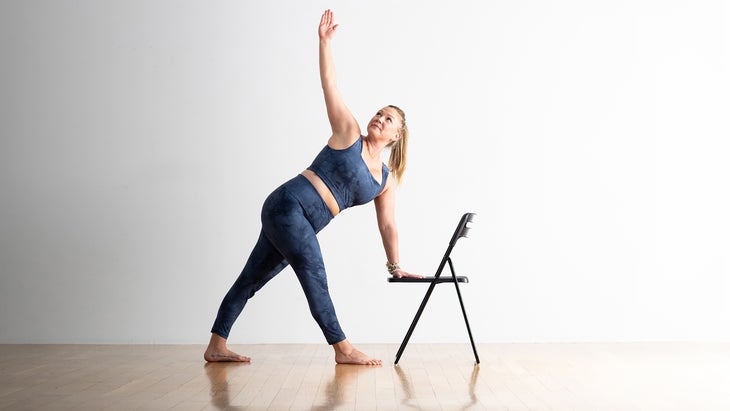
Begin standing in front of a chair and follow the directions above. When you twist into the pose, bring your hand to the seat of a sturdy chair.
Variation: Revolved Triangle Pose at a wall
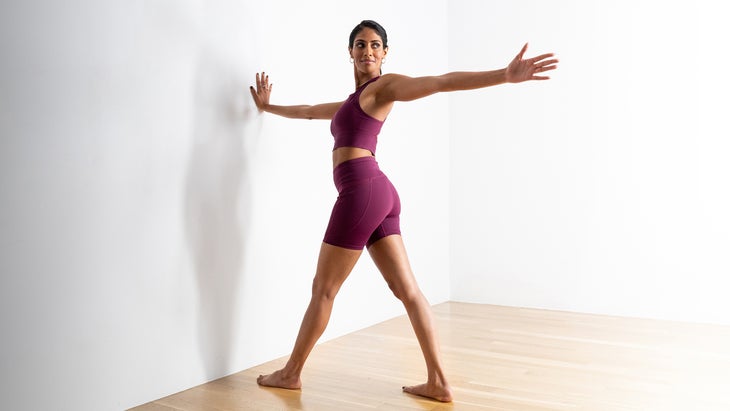
Stand arms-length from a wall. Step your left foot forward and your left foot back. Raise your arms out to the sides at shoulder height. Reach the crown of your head toward the ceiling to lengthen your spine and twist to the left, allowing your right hand to touch the wall and your left hand to reach behind you. Turn your gaze toward your left hand.
Preparatory poses
Bharadvajasana (Bharadvaja’s Twist)
Virabhadrasana I (Warrior I)
Parsvottanasana (Intense Side Stretch Pose)
Uttanasana (Standing Forward Bend)
Utthita Trikonasana (Extended Triangle Pose)
Follow-up poses
Uttanasana (Standing Forward Bend)