Heading out the door? Read this article on the new Outside+ app available now on iOS devices for members! Download the app.
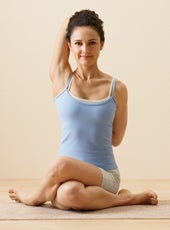
Gomukhasana literally means Cow Face Pose, a strange name to be sure, but a wonderful exercise all the same. The Sanskrit go is the etymological root of the English word—want to guess?—right, “cow,” and mukha means “face.” Where exactly is the cow face in the pose? Look at it straight on from the front: See how the crossed legs look like the lips, the up and down elbows like a pair of ears?
The seminal text on the physical practice of yoga, the Hatha Yoga Pradipika, contains only 15 asanas. And Gomukhasana makes the cut. The Gheranda Samhita, a 17th-century text, names 32 asanas. Again, Gomukhasana is there, and it’s described in this way: “Place both feet on the ground, putting them on either side of the bottom, and hold the body steady.” Nothing is said about what to do with the arms and hands, so modern yoga has devised an unusual arrangement, which we’ll practice.
B.K.S. Iyengar says the pose “makes the leg muscles elastic,” expands the chest, and extends the latissimus dorsi. It’s also one of the best shoulder openers around. It stretches the muscles of the upper back, upper arms, chest, hips, and thighs. Chances are good that you’ll also feel this pose in your ankles, arms, and hands.
Pose Benefits:
- Opens chest
- Stretches ankles, hips and thighs, shoulders, armpits, and triceps
- Extends latissimus dorsi
Contraindications:
- Serious neck problems
- Shoulder problems
- Knee injury
It’s a good idea to prepare both the shoulders and the hips for Gomukhasana. I like to have students start by grabbing a strap at least five to six feet long to warm up. Hold it so that your hands are three to four feet apart, then reach your arms forward, parallel to the floor, and make the strap taut. On an inhalation, slowly swing the strap above your head and pause at the apex of the arc for a moment. On an exhalation, slowly swing the strap down behind your back. Then reverse the arc, coming up on an inhalation and down in front of you on an exhalation.

As you swung your arms overhead, did your elbows bend? Did your shoulders scrunch up toward your ears? If so, then widen your grip on the strap about an inch or two and try again. Experiment with the distance between your hands until you can run through the arcs with your elbows straight and your shoulders released away from your ears.
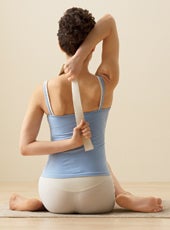
Next, slowly arc the strap back and forth for 30 to 60 seconds, until your shoulders feel comfortably stretched and lubricated. Then hang the strap over your left shoulder and reach your left arm straight out to your side, parallel to the floor. Rotate the arm inwardly: Starting with your palm facing the floor, first turn your thumb to point down and your palm to face back, then continue turning until your thumb points back and your palm faces up toward the ceiling.
On an exhalation, decisively bend your elbow and nestle your forearm into the hollow of your lower back, parallel to your waist. Tuck your elbow right against your torso. It’s likely that the flap of your front armpit (pectoralis major) will be caught between the side of your torso and your inner arm. Use your right hand to draw this flap out and lift it up toward the top of your shoulder. Next, slide your fore-arm up across your back until—in the best of all possible worlds—it rests against your spine vertically, with the back of your hand between your shoulder blades. Don’t be alarmed if you can’t quite do this, and don’t force the issue if you get stuck. Just do your best to keep your left elbow tucked neatly against your torso.

Next reach your right arm straight up to the ceiling and rotate it outwardly, turning the thumb to point right so the palm looks behind you. Then bend your elbow and, keeping the right arm tucked in beside your head, reach your right hand down to your upper right shoulder, grasping the strap in your hands. If possible, without the strap, hook the right and left fingers together. Make sure that you don’t push your front ribs forward when you hook your hands; lean back on your left forearm and drop your front ribs down and into the torso.
Hold for a minute or so, lifting the right elbow toward the ceiling, dropping the left elbow toward the floor. When I’m finished, I let go of my arms as quickly as possible. I got that advice from Iyengar Yoga teacher Ramanand Patel, and it’s like pulling off a Band-Aid quickly. Shake your arms out, then repeat the exercise on your other side, with the right arm down and the left up.
Sit Pretty
Now prepare your hips and legs. Sit on a thickly folded blanket with your knees bent and feet on the floor, heels about 18 inches away from your buttocks. Slide your right foot under your left leg to the outside of your left hip and lay the outer right leg along the floor. Then assume a loose cross-legged position by placing your left ankle just to the outside of your right knee, so that your sole is perpendicular to the floor and your left shin and knee are more or less parallel to the floor. The position of the top ankle outside the bottom knee is essential. (If you place the top ankle on the knee, your foot might twist, which can injure the knee.)
What you do next depends on the flexibility of your hips and groins—there are several possibilities. At one end of the spectrum, your left leg will angle sharply up toward the ceiling and refuse to go down. If this description fits you, it means that the muscles of your outer hips are tight at the moment, so stay where you are. You might have to raise your buttocks slightly higher if the leg position causes your torso to slump forward. Whatever you do, don’t push down on your knee.
At the other end of the spectrum, your left leg will rest easily on the right, and you’ll wonder what all the fuss is about. If so, slide your right front leg forward so that the shins are stacked on top of each other. Most of us will be somewhere in between these two extremes.
Did I mention that at some point you will feel a stretch in your right buttock? Oh, you will. Now tip your torso slightly forward and lay your hands on the floor in front of your shins. How far you’ll go will again depend on your flexibility. You might be able to lay your torso down easily on your inner legs, or you might find that a slight forward movement is sufficient to stretch the hips. In any case, don’t hunch over the legs. Keep your front torso long, and lean forward from your groins, not your belly. Stay for a minute or two, lift your torso on an inhalation, and repeat with your legs reversed.
Put It Together

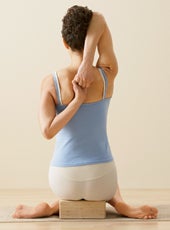
After all this preparation, the full pose should be a snap. Sit as you did at the start of the hip preparation, with your right leg on the floor and the right heel outside your left hip. Align your right knee with your navel. Next bring your left knee around in front of your torso and line it up with your navel. Then stack your left knee on top of your right and set your left foot on the floor beside your right hip. Iyengar is sitting on his feet in Light on Yoga, but I recommend arranging your heels so that they’re equidistant from your hips. Yes, the right foot stays snug beside the left hip, but that left foot wants to slide away from the right hip. If all else fails, you can always lay a sandbag on the left foot to weigh it down.
Now repeat the earlier arm arrangement, with your right arm up and your left arm down. (The arm on the top-leg side is by custom the bottom arm). You can intensify this position—as if it needed any more intensity—by doing what you did for the hip preparation: Lean your torso slightly forward over the legs, again lengthening the front torso as you do. Hold the pose for a minute, release, and then repeat on the other side, with the legs and arms reversed.
Gomukhasana typically causes lots of groaning from students during a yoga class, but we all should practice the pose more often. The arm position stretches the armpits and the backs of the upper arms (the triceps) and opens the chest, so it is an excellent preparation for backbends and inverted poses such as Handstand (Adho Mukha Vrksasana, or Downward-Facing Tree Pose) or Pincha Mayurasana (Peacock Feather Pose). The leg position stretches the outer hips and thighs, which makes it a good warm-up for a number of poses, including standing poses and sitting twists.
Richard Rosen is the director of the Piedmont Yoga Studio in Oakland, California.