Heading out the door? Read this article on the new Outside+ app available now on iOS devices for members! Download the app.
Supta Padangusthasana (Reclining Hand-to-Big-Toe Pose) is my go-to pose for lower-back pain. Its actions help create traction in the lower back, which can relieve compression and tension. And doing the pose on the floor allows you to safely stretch your hamstrings without putting much stress on your vertebrae. The floor supports your back and prevents it from rounding or pushing backward, an unhealthy movement for many back problems. Finally, the asymmetrical nature of the stretch can balance the two sides of the back. For most of us, one side of the body is dominant, which causes that side of the back to become tighter or stronger, distorting posture. Over time, these asymmetries can become the source of back pain or disk damage.
This seemingly simple pose allows you to delve into your consciousness, too. According to yoga philosophy, consciousness comprises three components: ego (ahmakara), mind (manas), and intelligence (buddhi). Normally, the ego, which identifies with what we can move, see, and know, dominates our awareness. As you do the pose, notice if your attention goes to your raised leg while the leg on the floor is out of sight and out of mind. Although all the action may seem to occur in the top leg, the benefits of the pose come from the proper extension of the leg on the floor and the interplay between the two legs. Although your ego may feel gratified if you pull your foot close to your head or catch hold of your big toe with your fingers, instead, let the intelligence in your lower leg determine how far to extend your raised leg. The result will be a safer, more beneficial pose for your legs, hips, and back, and a greater awareness of the union of body and mind.
Tight hamstrings don’t have to deter you from practicing this pose; using the belt in the first and second variations makes it accessible to all. The second variation stretches the lifted leg’s adductor muscles and can help address asymmetries in the pelvis and sacrum and relieve sciatic pain. Both variations teach the interactions between legs, hips, and lower back—principles that can be translated into your practice of standing, forward bending, seated, and inverted asanas.
Pose Benefits:
- Alleviates stiffness in lower back and some kinds of backache
- Stretches hamstrings, calves, and inner thighs
- Relieves arthritis pain in hips and knees
- Aligns pelvis
Contraindications:
- Hamstring tear
- First and last variations: menstruation, pregnancy, and diarrhea
- High blood pressure or a tight thoracic spine: Put a folded blanket under your head
Get Smart

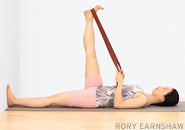
In this first variation, you will learn to gauge how far you can raise the uplifted leg and stretch your hamstrings while balancing the alignment of your hips, pelvis, and lower back. Lie on your back with the soles of your feet against a wall. Bend your knees slightly and place your palms under your sacrum. Use your hands to slide the skin of your buttocks and sacrum toward the wall as though you were smoothing out and lengthening your lower back. Then push your heels into the wall and straighten your legs without losing the adjustment you just gave yourself. This adjustment gives an important sense of direction for you throughout the pose, so feel free to repeat it if you have lost the sensation of lengthening the sides of your lower back toward the wall.
Press both thighs down and see if you can get them to touch the floor. Extend your calves toward your heels as you press the inner edges of your heels into the wall.
Bend your right knee into your chest, and place the belt around your foot. Hold the sides of the belt in each hand. Without disturbing your left leg, stretch and raise the right leg until it forms a 60-degree angle to the floor. It should be easy to straighten both legs; if you’re unable to, or if your right buttock lifts off the floor, lower the right leg a bit.
As you press the front of your left thigh into the floor, turn it inward so that the inner thigh remains grounded. Extend from here as you press your inner left heel into the wall. See if you can be sensitive to the stretch in your left leg as you raise your right leg closer to a 90-degree angle. By developing this subtle sensitivity, you build body intelligence. If the front of the left thigh pops up, pause, and press it back down. Don’t allow your ego’s impulse to crank your foot closer to your head overpower that inner wisdom.
Extend from your calves toward your heels. Observe the right buttock. Does it still feel long on the floor, the way it did after you adjusted it with your hands? If not, move the outer right hip toward the wall to lengthen the right side of your back and waist. Move the right thighbone down to ground the right hip socket. Also keep your shoulder blades on the floor. Broaden across the chest and collarbones, and let go of any tension in the face, neck, and throat. If your head tilts backward, place a blanket underneath it.
Now bend your elbows a bit and see whether you can bring your right foot closer to your head. Go slowly so that you don’t lose the extension of your left inner leg and the length in your right waist. The closer your right foot comes toward your head, the more you have to press your left thigh down, your inner left heel into the wall, and your right hip down into the floor. Let all of these actions determine how high to take the right leg. In other words, rather than focus on your right leg’s angle from the torso, spread your awareness throughout all the aspects of the pose while stretching that leg.
Hold the pose for up to one minute, and then bend your right knee and release the leg down to the floor. Stretch both heels into the wall before changing sides.
Take a Side

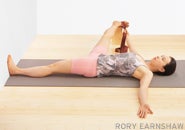
In this variation, the lifted leg extends to the side, which helps stretch tight hamstrings, groins, and adductors. Oftentimes lower-back and sacrum pain is accompanied by tightness in the groins and inner thighs, so this stage of Supta Padangusthasana is especially beneficial. If your legs and hips are tight, you may find this variation more accessible than the previous one. This is also the appropriate version to practice during menstruation and up to the fifth month of pregnancy.
Before you begin, you’ll need to place a block about an arm’s distance from your torso on your right side. Begin as you did in the previous variation, pressing both feet into the wall. Adjust your sacrum with both hands and extend both legs on the floor before placing the belt around your right foot. Now hold both sides of the belt together in your right hand and extend your right leg up toward the ceiling. Press your left thigh into the floor and your heel into the wall. With straight legs, turn your right thigh outward and lower your right leg to the right, in line with your hip.
Pause for a moment halfway down, and again charge your left heel into the wall, keeping your left hip on the floor so that you don’t topple over to the right side. Extend from your inner right thigh to your inner right heel, and move your outer right hip and buttock away from your head toward the wall, the way you did when you adjusted yourself earlier. Keeping the legs straight and the left side grounded, lower your right leg more and place the outer edge of your foot on the block. If the block isn’t tall enough or if your left hip lifts off the floor, add another block or some blankets, or use the seat of a chair for support. As in the previous variation, let the intelligence in your left leg guide how far you lower the right leg. As you keep your left hip down, extend the inner left leg toward the inner heel, and press the top of the thigh into the floor. Extend both inner legs away from your pelvis and away from each other.
Relax your face and throat and take a few smooth exhalations. Look up at the ceiling, keeping your head, chest, and abdomen centered. On an inhalation, bring your right leg back to 90 degrees, bend the knee, and place the leg on the floor. Repeat the pose on the other side.
Tip Toes

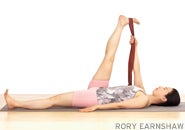
Now come away from the wall. Lie on your back, smooth your buttocks down, and straighten your legs. Press both thighs into the floor and extend from your calves as if you were still pushing into a wall. Place your left hand on top of your left thigh. Bend your right knee toward your chest and reach your right arm along the inside of your right leg to catch the big toe with your index and middle fingers. Keep the left thigh pressing into the floor as you stretch your right foot toward the ceiling. If you can’t straighten both legs or if your right buttock lifts off the floor, use a belt around the right foot, walking your right hand up the belt until your arm is straight.
Press the front of your right thigh back to fully straighten the leg. Move the top of your right thigh down into the hip socket to ground the hip onto the floor. Move the right buttock away from your head so that the right side of your waist feels as long as the left. Meanwhile, press the inner edge of your left leg into the floor and keep extending from the inner thigh toward your left inner heel.
Again, be aware of the left leg. If you feel that the top of your thigh is lifting, push it down.
Because the left leg may turn outward, which will distort your pelvis and back, rotate it inward (rolling the outer thigh toward the inner thigh) from the hip to keep the front of the leg facing straight up. As the back of the left thigh descends, it will feel as if the stretch originates in the left side of the lower back.
Relax your face. As you exhale, move your right shoulder down toward the floor and broaden your chest. Continue to spread your awareness through your whole body, to the parts that are both seen and unseen so that no aspect of the pose is untouched by your intelligence. Hold for a minute, and then bend your right knee toward your chest, release the right leg to the floor, and change sides.
The alignment of your legs, hips, back, and pelvis in this asana will not only aid you in the practice of all categories of yoga poses, but will also teach you how to practice with patience and humility. When you use your intelligence as a guide in your asanas rather than being driven by the goals of the ego, your yoga practice will lead toward a peaceful sense of physical and mental harmony.
Marla Apt is a certified Iyengar Yoga teacher. She teachers and leads teacher trainings in Los Angeles and abroad.