Heading out the door? Read this article on the new Outside+ app available now on iOS devices for members! Download the app.
Forget destination and let Upavistha Konasana take you on an inner journey. Here are your directions, enjoy the ride.
At its most basic, a forward bend opens the entire back of your body. When you take the shape of a forward bend, you fold in toward yourself, which encourages a sense of introspection and stillness that is sometimes hard to find in postures that are more invigorating, such as backbends and standing poses. However, as you move into a pose like Upavistha Konasana (Wide-Angle Seated Forward Bend) and begin to stretch your hamstrings and adductors (inner-thigh muscles), you may notice your thoughts and emotions becoming stimulated. You may find yourself making comparisons to others or wishing you could draw your body closer to the floor. Upavistha looks simple, but the mental patterns this pose engenders can be revealing and enlightening.
The yogic sage Patanjali described the conflation of who you really are (an eternal soul) with who you think you are (the only one in the room who can’t get my chin to the floor!) as asmita, or egoism. This confusion causes suffering. Yet, as Patanjali also said, “Heyam dukham anagatam” (or “The pain that is yet to come can be avoided”). How does all this relate to Upavistha Konasana? Patanjali’s observation invites you to back off from a version of a pose that may be too intense for you (or even injurious). When your ego rears up and urges you to go deeper, remind yourself not to mistake who you are for how you do a pose. As the floor beckons you, move gently and attentively, opening both your muscles and your mind along the way.
Long Lines
In the first yoga workshop I ever took with a senior teacher, John Schumacher told his students that in practically every yoga pose, you work on lengthening your spine. This is particularly important to keep in mind in forward bends, since the tendency is to collapse inward when going further and deeper into the pose. Tight hamstrings will definitely interfere with your ability to lengthen the spine. The hamstrings attach to the ischial tuberosities (sitting bones), which are the bony points that you can feel through the flesh of your buttocks. When the hamstrings are short, they pull the back of the pelvis down, creating what is known as a posterior tilt. This happens when you tuck your pelvis and round your lower back. When you bend forward with a rounded lower back, you put pressure on the disks and strain the lower-back muscles, leaving yourself open to injury. In many cases, the solution to this potentially harmful situation is to elevate the hips by sitting on blankets. This lessens the pull on tight hamstrings and gives the spine more freedom to lengthen.
Pose Benefits:
- Lengthens hamstrings
- Stretches adductors
- Calms nervous system
- Can relieve sciatic pain
Contraindications:
- Hamstring or groin pull or tear
- Lower-back injury
- Herniated disk
Proper Props

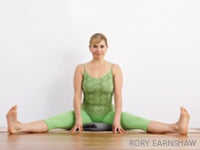
To determine whether to use a blanket or two, sit in Dandasana (Staff Pose) with your legs extended in front of you. Open your legs slightly wider than a 90-degree angle, keeping your kneecaps facing the ceiling. Then turn your attention to your sitting bones. Are you right on top of them, or are you on the back edge or even behind them? Place your hand on your sacrum, the flat bony plate at the base of your spine. Is it vertical, or is it tilted backward, causing you to round your lower back? If you are leaning on the back of your sitting bones and your lower back is collapsed, you have a couple of options.
First, look at your thighs and notice whether they are rolling forward or backward in your hip sockets. (Ideally, your knees will be pointing straight up toward the ceiling.) If your thighs are rolling back with your knees pointing behind you, you may be able to correct the tilt of the pelvis by rolling the thighs forward until the knees face the ceiling, and the thighs are in a neutral position. Take hold of your inner and outer thigh, one leg at a time, and shift the flesh forward. In other words, lift your outer thigh and release your inner thigh toward the floor. Are you now more securely and evenly on top of your sitting bones? You’ll know that you are if you can more easily lengthen your lower back.
If that doesn’t do the trick, raise your hips by sitting on a folded blanket with a corner pointed forward between your legs so that your buttocks are on the blanket, but your legs are not. Lengthen your spine from your lower back to the crown of your head. To create this lift through your torso, activate your legs. Take your fingertips to the floor behind you and use your arms for support. Make sure that your thighs are neutral (not rolling in or out), flex your feet, and point your toes up to the ceiling. Lengthen the front of your body by extending your breastbone away from your navel. Now start to press down with your femurs (thighbones). The more that you press down with your legs, the more you will be able to lift your spine, in much the same way that a tennis ball will bounce higher the more energy you expend to throw it down. Use the relationship between the legs and the spine to create a blueprint for the next step.
Extend From Your Base

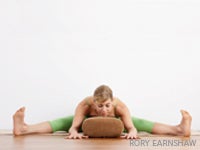
If you’re ready to move into the forward bend, place a bolster on the floor in front of you and in line with your upper body. Maintain the neutral position in your thighs and continue to press them down firmly. Ideally, you’ll keep your thighs stable and unmoving, and then roll your pelvis over them as you fold forward.
Inhale and lengthen your spine. As you exhale, sustain this length, keep the femurs fixed, rotate your pubic bone toward the floor, and start to walk your hands forward as you reach your torso toward the bolster. Extend from your base instead of bending from your waist, so that you keep the front body long rather than collapsing the chest and rounding the back. If, and only if, you can keep your sitting bones grounded and your quadriceps facing the ceiling, try to lay your torso along the bolster. Keep your sitting bones grounded to maintain the stability of your base, or you’ll compromise your ability to find true extension in your spine. Stay for 10 breaths. Notice how your hamstrings and adductors respond: If you’re tight in these muscles, you will experience some sensation as you start to stretch them. Just make sure that the feeling is in the realm of a dull ache, not anything sharp or piercing. Avoid straining your body.
Stay Grounded

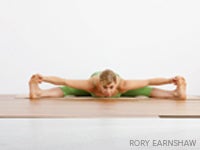
If you feel as though your body can comfortably move farther toward the floor, slide the bolster out of the way. Recommit to engaging your leg muscles and anchor the pose by fixing your femurs. Once you’ve done this, hold on to your big toes with the first two fingers of each hand. Once again, use your inhalation to extend your sternum away from your navel and lengthen your spine. On your exhalation, keep your sitting bones rooted and start to reach your chest forward. The tendency (especially if you are flexible) is for your legs and sitting bones to follow your torso and roll toward the floor. Resist this inclination to roll forward. Keep your sitting bones heavy, even if you don’t go as far. You may be able to maintain this alignment and get your chin to the floor, but remember that the ultimate goal is to practice attentively, observing the effects of your actions, rather than to pursue some final form of the pose.
As you remain in the pose for 10 to 15 breaths, remember that forward bends can naturally induce feelings of surrender and calm, if you gently release into the flow of gravity and tune in to your inner landscape. Cultivate these mental qualities through your physical approach to the pose. Stay grounded both literally and metaphorically by building a solid foundation, and then activate your legs and extend your spine. Root your attention firmly in the present moment as you decide how deep to go into the pose.
Before and After
Here are some ideas for poses to practice.
The first two are nice preparatory poses for Upavistha; the third can be practiced before or after, and the fourth is best practiced afterward.
Supta Padangusthasana (Reclining Hand-to-Big-Toe Pose)
Lie on your back, with your right knee drawn into your chest and your left leg stretched out along the floor in front of you with your left knee pointing toward the ceiling. Place a strap across the ball of your right foot and extend your right heel to the ceiling. Hold for 10 to 15 breaths and then switch sides. This pose opens your hamstrings without putting any strain on your lower back, so it’s a great preparation for Upavistha.
Dandasana (Staff Pose)
Sit with your legs extended in front of you and your feet flexed. Point your toes and the fronts of your thighs up to the ceiling; elevate your hips on blankets if you feel your lower back rounding. Place your hands beside your hips and ascend the crown of your head to the ceiling, creating as much length as possible along your spine. Working in this posture will help you stretch your hamstrings and strengthen the muscles of your spine that keep you upright and extended along your front body. Both elements will help you find more spaciousness and ease in Upavistha.
Urdhva Upavistha Konasana (Upward Wide-Angle Seated Forward Bend)
Lie on your back and open your legs into Upavistha while lightly placing your hands on your inner thighs or calves, letting gravity do some work. You can practice this pose either before Upavistha to stretch the legs without involving the spine, or afterward, as a more relaxed version of the pose.
Apanasana (Knees-to-Chest Pose)
Lying on your back, close your eyes and draw your knees into your chest, giving them a good squeeze. To deepen the stretch, release your pubic bone away from your navel and toward the floor as you hug your knees in. This action reinforces the action of separating the movements of the legs and the pelvis, a principle that is central to forward bending. Apanasana is also a nice way to turn in after the openness of Upavistha. The shape of the pose is very compact and almost fetal, so the physical characteristics can generate a parallel quality of mentally drawing in as well.
Natasha Rizopoulos lives and teaches yoga in Los Angeles and Boston.