Heading out the door? Read this article on the new Outside+ app available now on iOS devices for members! Download the app.
Puzzled by Marichyasana I? Build the pose from its composite parts, and you’ll extract its subtle essence.
If you watch experienced yogis go deeply yet skillfully into an asana, you’ll notice that the depth is not just about the severity with which they fold their bodies or the extent to which they stretch their muscles. The depth you perceive comes from the evenness and balance they create from inside the asana. This type of depth stems from an awareness of the breath, the movement of energy, and the subtle physical actions that make up the pose.
Finding evenness and balance in Marichyasana I is challenging for several reasons. On a gross level, creating evenness in this pose is difficult because it’s asymmetrical. One sitting bone is on the ground, the other is off. One side of the chest tends to push back while the other side pushes forward and down. Add to that the complex combination of poses and shapes that are superimposed on Marichyasana I: One leg is in Malasana (Garland Pose), while the other is in Paschimottanasana (Seated Forward Bend). The spine has to round forward and twist slightly while the breastbone lifts and lengthens, as it does in a backbend.
The pose also combines elements of Chaturanga Dandasana (Four-Limbed Staff Pose) in the upper chest and shoulders, and of Salamba Sarvangasana (Supported Shoulderstand) in the relationship between the arms and the chest. The elements that compose Marichyasana make this asana an intriguing puzzle. When you add the asymmetry of the pose to the complex pattern, you get a veritable Rubik’s Cube.
And yet, if you’re flexible and can whip yourself into it as easily as tying your shoes, then many of these subtleties have probably never occurred to you. If that’s the case, you’ll have to be more patient with the pose to extract its essence. As with any asana, getting into it is only the beginning. When you work on Marichyasana I, try to find a balance between twisting and forward bending, releasing and contracting, activity and receptivity, grounding and levity, and right and left. Instead of setting all of the shapes and energy lines at odds with each other, try to weave them together, much like a symphony weaves so many instruments and notes and rhythms together to make a harmonious melody.
As you move through the sequence, continually scan your body. Some areas will be working hard; some will be asleep. Some parts will be compressed; others will be elongated. Some parts rise and fall with the breath; others will be as hard as rock. As you observe, begin to make adjustments to create as much evenness and balance as possible.
In Marichyasana, attempt to create layers of poses within the pose. Are you re-creating the Malasana squat by lightly contracting your hamstring? Or do you just have one leg bent with your foot on the floor? Are you drawing your arms back as you propel your chest forward, or are you simply collapsing your chest into a forward bend? You should be using your arms so much that your body is springing out of the position. Your tailbone will not touch the floor, but energetically root it down. Let the forward bend arise as a counterbalance to this rooting. As you press down with the straight leg and tailbone and draw up and forward with the chest, notice whether Mula Bandha (Root Lock) occurs. Your level of attention is the only limitation to what you can uncover in Marichyasana I.
5 Steps to Marichyasana I
Before You Begin
The following sequence is a starter kit for understanding the elements that make up Marichyasana I. If you approach each pose gently and nonviolently, then you don’t need to do a specific preparation for it. In fact, sometimes it’s more beneficial not to warm up for a posture, because then your habitual imbalances will show up more clearly. However, if you feel you’d like a preparatory sequence, do Adho Mukha Svanasana (Downward-Facing Dog Pose) for two minutes, Uttanasana (Standing Forward Bend) for a minute, and Balasana (Child’s Pose) for two minutes.

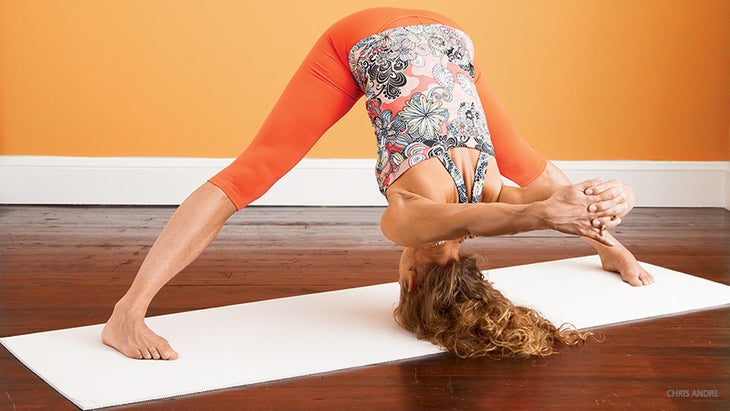
Prasarita Padottanasana (Wide-Legged Standing Forward Bend)
Prasarita Padottanasana combines a forward bend and an inversion, which centers the mind and gently opens the hamstrings as well as many muscles deep inside the hips. As you do the pose, focus on engaging your legs strongly, which will help you ground the backs of the legs in Marichyasana I. The arms in this specific variation replicate the action and position of the arms in Marichyasana I.
Stand sideways on your mat with your feet about four feet apart and parallel to each other. Draw the muscles of your legs to the bones and up toward your hips. Interlace your fingers behind you and straighten your elbows. Lift and open your chest from the power of your arms and legs. Release forward from your hip joints, moving the crown of your head to or toward the ground. If your head doesn’t touch the floor, rest it on a block at whatever height you need to. Supporting the head helps calm the nervous system.
Continue to reach your arms toward the floor behind you without straining your shoulders. If this pose is very difficult, you can bend your knees slightly and fold deeper from your hips, resting your hands on your back. Remember, it is not how far you go, but how deeply you integrate the actions of the pose as you create evenness and balance.
Move your thighbones back toward your hamstrings. Even out the weight between your feet. Wiggle your waist long as you relax the neck and head. Notice your breath: Has your exhalation gotten longer? If so, that’s a sign you’re relaxing into the pose. If not, try to consciously lengthen your exhalations.
Hold the pose anywhere from 30 seconds to two minutes. Then release the clasp of your hands and place them on the ground underneath the shoulders. Walk your feet closer together, take your hands to your hips, and press the buttocks flesh down as you stand up. Find your center in Tadasana (Mountain Pose).

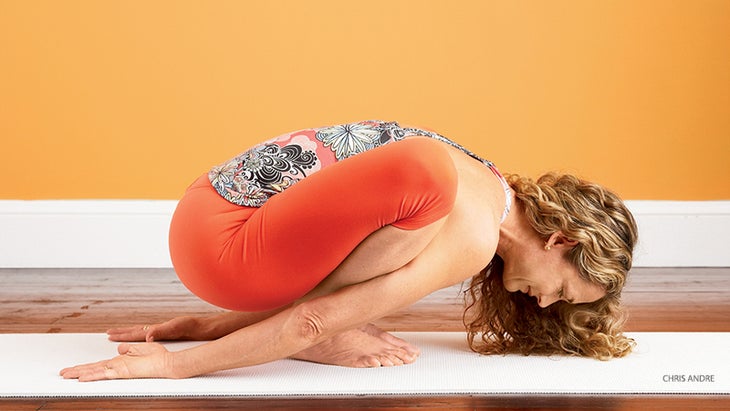
Malasana (Garland Pose)
If you look closely at the bent leg in Marichyasana I, you will see that it’s in a squat. Warming up with Malasana will teach you how to deeply fold your legs as you open your calf muscles and hip joints. It is also a great release for the back muscles, so when it’s time for Marichyasana I, you’ll find it easier to root your tailbone and round your back. Finally, Malasana will help you turn inward and begin the journey toward silence and meditation.
Place your feet together and squat. If your heels come off the ground, place a folded blanket under them. Allow your knees to move away from each other just enough to let your torso drop through.
Let your torso, neck, and head round forward. If possible, bring the crown of your head and your tailbone an equal distance from the ground. Reaching down through your inner heels, deepen your groins and hug your legs into your torso. Walk your armpits down your shins and internally rotate your upper arms, bringing your hands behind you, palms up. As you move deeper into the pose, remember that there is no need to use force. If you can approach the pose without aggression, you will imprint a pattern that prepares you for Marichyasana I.
Notice how the deep folding of your body helps to accentuate the completion of your exhalation. Breathe here for 30 seconds to a minute. To come out of Malasana, place your hands on the ground underneath the shoulders, press your feet into the ground, and lift your hips into the air as you draw the legs together, straightening them as you move into Uttanasana (Standing Forward Bend).

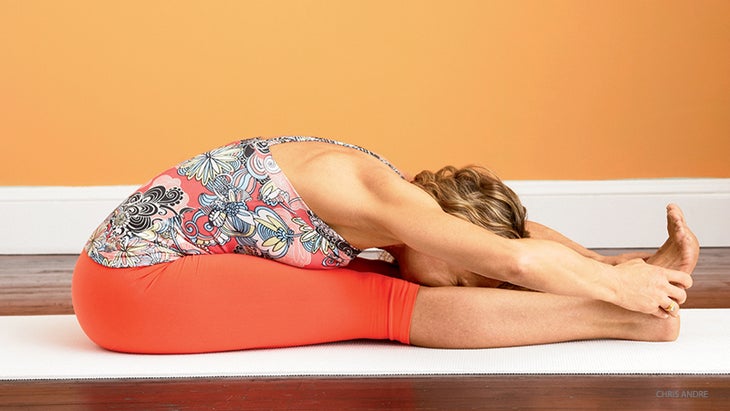
Paschimottanasana (Seated Forward Bend)
The king of all forward bends releases the entire back body and calms the nervous system. It also opens the hamstrings and calves, which prepares both legs for their role in Marichyasana. When you stretch the back of the legs, folding the leg becomes easier, too.
Begin in Dandasana (Staff Pose), pressing the backs of your legs down. Notice how pushing too strongly creates rigidity and aggression, whereas not enough action results in lethargy and apathy. From this contact to the earth with your feet and legs, lift your chest up. As your torso floats skyward, your sacrum and spine deepen into your torso. This is the beginning of the forward bend.
Fold forward from the hips and, as you do, reinforce the pressing of your legs and feet into the ground. Every step of the way, feel how the grounding element of your legs helps your torso, arms, and head move forward. To make this Paschimottanasana more applicable to Marichyasana, keep your collarbones spread and traveling forward. Gently pull your torso forward with your arms, but do it in such a way that your chest stays open instead of collapsed.
Think of the arms as an extension of your heart, and use them to open your chest instead of using them to play tug of war with your hamstrings. (This is a pose that you never want to force. If your hamstrings are tight and pull on your lower back, then sit on a folded blanket, bend your knees slightly, or do both.)
Your torso will seem to float over the ground of your legs. Periodically adjust the pose to create an even stretch from the heels to the crown of the head. Stay from one to five minutes. To come out of this pose, ground the legs deeper and lift to Dandasana on an inhalation.

Bharadvajasana II (Bharadvaja’s Twist II)
This pose sets up the pattern of deeply folding your legs and turning your torso the way you will in Marichyasana I. Take note of the subtle movement in the pose, too. Its grounding and lifting actions will energetically prepare you for the final pose.
Sit in Staff Pose and bend your left leg into a squat. Then move it into Virasana (Hero Pose). Bend your right leg deeply, and then open it into Ardha Padmasana. (Half Lotus Pose). Hike the Lotus foot high into the hip crease of your left leg. Pull your knees closer together and reach your right arm around your back to clasp your right foot. Turn and place the back of the left hand under or to the outside of your right knee. Ground down through the legs on the inhalation, and twist to the right on your exhalation.
If it’s difficult for you to put one leg in Virasana, then sit on a block. If it’s difficult for you to do Half Lotus, then just place the leg in Ardha Baddha Konasana (Half Bound Angle Pose). If you can’t bind your arms, simply reach for the right foot or place a strap around it.
There is a tendency in this pose to turn from the neck and head. Instead, lead with the belly and the width of the back muscles. Let the neck and head follow. It is also common for the tops of the thighs to lift away from the floor, so anchor them down every step of the way.
As you stay in the pose for a few breaths, allow there to be an ebb and a flow in the pose instead of staying stagnant. Listen to your breath, and you’ll notice that as you inhale, you come slightly out of the twist; as you exhale, you go deeper. Sometimes it’s nice to slightly exaggerate this for a while and then allow it to become more and more subtle. Stay for a minute or two.
Coming into and out of this pose mindfully will help protect your knees. Release the bind; bring the Lotus leg into Ardha Baddha Konasana, and then into a squat. Press down with the squatting foot, lift the hips, and sneak the Virasana foot forward into Ardha Baddha Konasana. Extend the legs to Staff Pose and move into Marichyasana I before you do your second side.

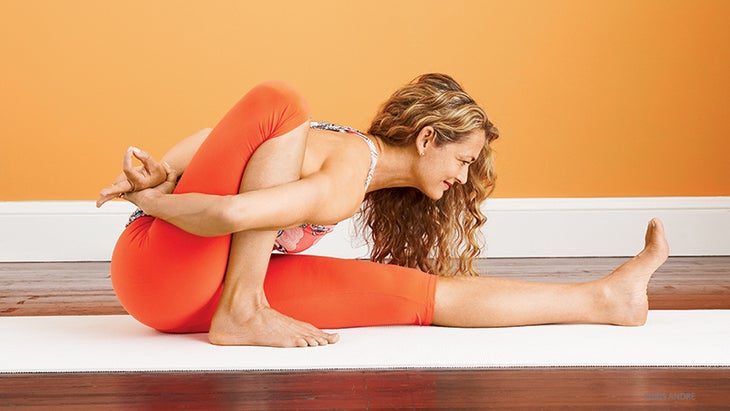
Marichyasana I
Start in Dandasana. Bend your right leg into a squat, bringing your right inner heel to the outside of your right sitting bone. Your right sitting bone will likely lift off the ground. Hug your squatting leg with your right arm to increase the fold of your leg as you simultaneously ground down through your heel. Notice the completion of your exhalation. Keep your tailbone rooting down and slightly forward toward the left heel.
If it’s challenging for you to squat deeply, then stay here and don’t try to bind the arms. The bind is directly related to how deeply your leg folds. Even an inch makes a difference. Don’t get frustrated trying to bind if the bent leg doesn’t fold deeply yet.
If your body proportions and flexibility allow you to go further without strain, drop your torso just inside your right leg. Place your left hand on your right ankle, and pull your torso forward. As you exhale, pull your chest forward so you can get your right armpit as far down your right shin as possible without gripping your neck, face, or breath.
From there, wrap your right arm around your right leg, getting your right wrist and hand up over your right buttock. Swing your left arm around your back and clasp your left wrist with your right hand. Draw your arms into their sockets as you firm your shoulder blades against your back. Widen your collarbones and propel your chest forward as if you were in Chaturanga. Look forward to further open your chest.
Your squatting leg will be deeply compressed like the tight coil of a serpent. Your right knee will move forward over the toes. Your arms squeeze the folded leg as the shin pushes forward against the armpit. This will help move your chest forward toward the left leg.
As your chest moves forward, your tailbone, your bent-leg thigh, your foot, and your straight leg press down. Gazing over your nose into the world, feel the rise and fall of your breath. Find a sense of repose within the pose. Stay for 30 seconds to a minute. Come out of the pose mindfully by imagining you are going deeper into it before you release the clasp. Come into Dandasana, then repeat Bharadvajasana II to Marichyasana on the other side.
After a minute or so, move into Supta Baddha Konasana (Reclining Bound Angle Pose) and stay for three to five minutes with your knees supported, which will return your lower back to its natural curve.
The Zen teacher Thich Nhat Hanh says that the past, present, and future are all in the present moment. In other words, everything you’ve done in the past is here with you in the present. When you think of this in terms of an asana sequence, you realize that every action you learn in the early poses leaves an imprint that you take with you into finishing poses. In this sequence leading to Marichyasana I, take all that you’ve learned in Prasarita, Malasana, Paschimottanasana, and Bharadvajasana, and layer it together to create the final pose.
Let previous poses create a residue that you feel when you do Marichyasana I. It’s more like a great symphony than a solo concert: You have a first note, and you link that first note to every other note all the way to the end. Playing a single instrument can be wonderful, but when you weave it with other instruments, you experience something full, alive, and powerful—a work of art.
To Finish
Lie back with your feet as wide as your mat and drop your knees together. Wrap your arms around your torso like you’re giving yourself a hug. This is constructive rest, and it is a wonderfully balancing and cooling pose to do after Marichyasana I.
ABOUT OUR EXPERTS
Colleen Saidman is the owner and director of Yoga Shanti in Sag Harbor, New York.
Rodney Yee continues to value the puzzles life offers and uses his yoga practice to help him unravel them. Together, they teach yoga around the world.