Tip #53 Shopsmith Overarm Pin Router - Shopsmith Woodworking ...
Tip #53 Shopsmith Overarm Pin Router - Shopsmith Woodworking ...
Tip #53 Shopsmith Overarm Pin Router - Shopsmith Woodworking ...

Create successful ePaper yourself
Turn your PDF publications into a flip-book with our unique Google optimized e-Paper software.
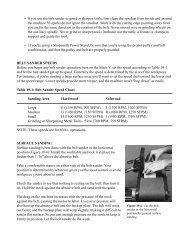
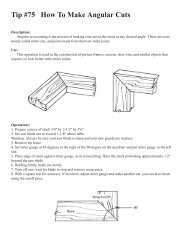
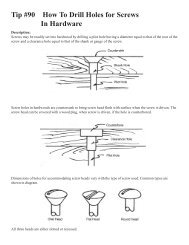
<strong>Tip</strong> <strong>#53</strong> <strong>Shopsmith</strong> <strong>Overarm</strong> <strong>Pin</strong> <strong>Router</strong>The <strong>Shopsmith</strong> Routing Systemis a home or small shop version of acommercial machine that wasoriginally developed for high-speedmass duplication of furniture partsand components.In the overarm mode of operation,a rigid arm holds a routermotor securely in a fixed positionover the table surface. The armitself has a built-in quill-feed leverthat controls the depth-of-cut.During the duplication process,the routing system suspends arouter motor and bit above aprecisely aligned pin which protrudesup from the table surface andrides in a precut groove in theunderside of a guiding fixture. Byguiding fixture. By guiding thefixture over the pin, the operatorcan cut the identical design orshape in a workpiece attached tothe top (or opposite) side of thefixture.Figure 22-1. The <strong>Shopsmith</strong> Routing System.In the undertable mode, thebase of your router is attached tothe underside of the table. Whenthe router is installed in this manner,the router bit will protrude upthrough the table surface.Besides the obvious timesavingbenefits of high-speed duplication,the routing system also offerscertain safety advantages by providingimproved visibility and controlof the work, as well as the ability toperform operations on smallerworkpieces that would be almostimpossible to grip firmly whileusing a hand-held router.The routing system will cut-out,shape, mold, mortise, duplicate andform intricate, professional-lookingjoinery for a wide variety ofprojects.ROUTING SYSTEM-SETUPAND FEATURESTo set up your routing system,follow the instructions in theOwners Manual that came withyour Routing System.The <strong>Shopsmith</strong> Routing System(Figure 22-1) offers a number ofunique features:• In the overarm mode, the throatcapacity of the routing systemranges from 13-5/8" to 15-1/8"(depending upon the diameterof the router motor being used).• By moving the arm to the top ofthe steel column, projects up to12" thick can be worked ineither the overarm or undertablemode with ease.• In the overarm mode, the armholds any router motor from 2-1/2" to 4" in diameter firmly inposition.• For under-table routing, auniversal table plate will acceptvirtually any router base forquick, simple mounting.• The routing system's precisionrack-and-pinion vertical feedmechanism offers up to 3-1/2"of vertical travel to provideeasy depth-of-cut controlduring over-arm operations.• A large see-through guardkeeps your hands and fingersout of the danger zone, protectsyour eyes, and directs debris toa dust collection system.• The worktable is 30" wide by18" deep and offers over 7" offront-to-back adjustment. It canbe locked into position at anylocation. Its smooth, laminatedsurface offers a large number ofthreaded holes to enable theconvenient attachment ofoptional feather boards, fencesand other devices to improve
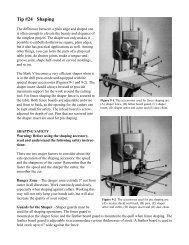
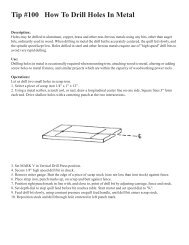
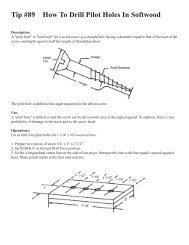
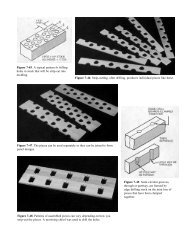
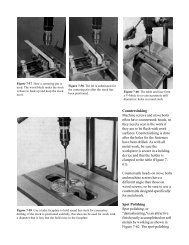
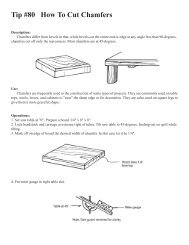
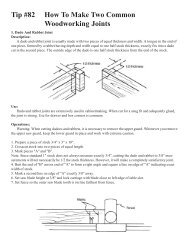
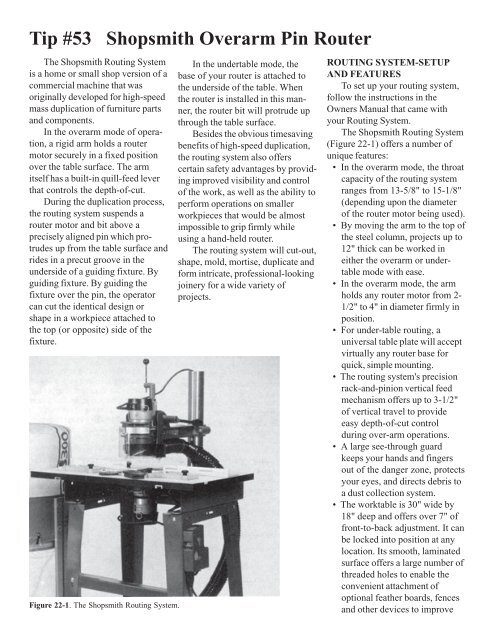
workpiece control and safetyduring operations.• The built-in miter rail allows theuse of the <strong>Shopsmith</strong> MiterGauge as a guide or safetydevice during operations.• Interchangeable table insertsprovide adequate workpiecesupport when using a variety ofdifferent sized router bits.• Screw-in guide pins allowprecision pin routing with avariety of bit sizes.• The optional two-piece adjustablefence is used to guideworkpieces during straight-linerouting and for mounting fenceextensions and stop blocks.ROUTER BITS<strong>Router</strong> bits come in a largevariety of shapes and sizes, eachdesigned to preform a specificoperation. Generally speaking, mostrouter bits have three main components.These are the shank, the fluteand the pilot (Figure 22-2).The shank is the part of the bitthat is gripped firmly by the collet(or chuck) of the router motor. Thepilot is the portion that ridesagainst the edge of the workpieceand controls the depth-of-cut of thebit during operations. The flutesare the cutting edges of the bit.Piloted Versus Un-Piloted BitsWhen buying router bits, youhave the option of selecting eitherpiloted or un-piloted bits (Figure22-3).Piloted bits are used whencutting a decorative profile on astraight or curved workpiece wherethe entire edge of the workpiece isnot to be removed. When choosingpiloted bits, you can select frombits with solid pilots or bearingpilots. Solid pilot bits are lessexpensive, but create friction thatcould burn your workpiece edgeduring cutting. Although bearingpilot bits are slightly more expensive,they will eliminate this frictionand burning of the workpiece edge.Un-piloted bits offer no edgeguide and will cut all the way to thetip. They are therefore designed foruse on projects where the entireedge of the workpiece is to beremoved or a decorative cut isdesired somewhere within theperimeter of the stock. As a result,they should always be used with afixture, guide pin or fence.<strong>Router</strong> Bit Materials<strong>Router</strong> bits are available in avariety of different materials, basedupon the amount of use they areexpected to receive and the types ofmaterials they are intended to cut.High-speed steel bits are themost commonly available type andare intended for occasional useonly, or for working with softwoods such as pine or redwood.These are the least expensive of allbits and offer limited use beforesharpening is required.Carbide-tipped bits generallyoffer high-speed steel shanks andbearing pilots with carbide cuttingflutes welded-on to provide formore extended use before sharpeningis required.Carbide-tipped bits should beused for working with hardwoodssuch as oak or maple, plasticlaminates or composite materialsFigure 22-2. Components of a typicalrouter bit.like particleboard. These bits areslightly more expensive than highspeedsteel bits.Solid carbide bits are usuallyonly available in simple, straightprofiles and offer the same benefitsof durability as carbide-tipped bits.<strong>Router</strong> Bit Types<strong>Router</strong> bits are available inmany different shapes for a varietyof specialized jobs. Figure 22-4shows examples of the types thatare available.Mounting <strong>Router</strong> BitsAlways insert the bit all the wayinto the router's collet and thenback it out about 1/8" beforetightening to prevent the transfer ofheat and vibration from the bit tothe router motor armature.<strong>Router</strong> Bit StorageWhen storing router bits, neverthrow them carelessly into a drawerwith other tools. This could resultin nicking of the edges and necessitatecostly, professional sharpening.In addition, avoid storing themin a damp location, as this willcause rusting (and dulling) of theedges. One suggestion is to storethem in an enclosed area withcamphor tablets (which coat the bitwith a thin, rust-inhibiting film).Cleaning <strong>Router</strong> BitsOccasionally, router bits willcollect pitch that should be re-Figure 22-3. <strong>Router</strong> bits are available inpiloted or unpiloted styles.
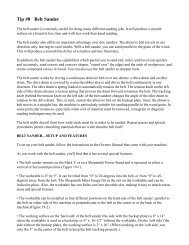
should either be replaced or takento a professional sharpening service.Figure 22-4. Just a few of the wide variety of router bits that are available.moved to prevent burning of thework-piece edges. This cleaningcan be easily performed withhousehold oven cleaner. However,always remove bearing pilots frombits to avoid getting solvents oroven cleaner in the bearings. Thesematerials will destroy the bearinglubricant and cause prematurebearing failure.Sharpening <strong>Router</strong> BitsAs with all cutting tools, routerbits require occasional sharpeningfor optimum performance. Highspeedsteel and carbide-tipped bitscan be easily honed in the shop (seeChapter 24 for sharpening techniques).However, if carbide-tippedor high-speed steel bits becomeextremely dull or nicked, theyROUTING SYSTEM SAFETYWarning: Before using therouting system, read and understandthese important safetyinstructions:Danger Zone-The danger zoneon the routing system includes anylocation within 3" of the rotatingbit. Always keep hands clear of thisarea when working with the machine.Protective Guard-Keep theseethrough guard in place and set atno more than 1/4" above the surfaceof the workpiece duringoverarm or undertable routing.• Always wear proper eye and earprotection.• Never attempt to clamp theoverarm assembly onto anycolumn less than 2-3/4" indiameter by using bushings oradapters.• Follow your routermanufacturer's recommendationsas to replacement parts foryour router.• Before beginning any operationor turning on your routermotor, always check to be surethe router, overarm assembly,depth stop rod, depth controlhandle, worktable, table plate,accessories, safety devices,fences and fixtures are secured.• Whenever possible, use a pushstick, push block, feather board,miter gauge with safety grip,fixture or other safety device tomaneuver a workpiece into therotating bit. This is especiallytrue of small or narrow stock.• Always keep a firm grip on yourworkpiece and never hold itwith your hand in line with thebit.
• When cross-grain routing stockup to 10" wide, use your mitergauge with safety grip tocontrol the workpiece (whichmust extend 5-1/2" away fromthe router bit).• To prevent the router fromgrabbing and throwing theworkpiece, always feed thestock against the rotation of thebit and never with it. Duringoverarm routing, stock beingworked in front of the bitshould be moved from left toright. During under-tablerouting, stock being worked infront of the bit should be movedfrom right to left.• Always cut with the grain of thewood and not against it for asmoother, safer cut.• To avoid being hit by a thrownworkpiece, never stand in-linewith the workpiece being fed.• Never rout second-hand lumber.It may contain nails or screwsthat could damage your bit andcause serious injury.• Use extra care when work-ingstock that contains highlyfigured grains or knots to avoidkickbacks.• Do not rout boards that arewarped, bowed or cupped.• When working long boards orsheet materials, always sup-portthem adequately with rollerstand(s) placed from 1' to 4'from the table.• Never freehand rout stocklessthanl2" x 12"insizeorequivalent.• With the exception of singlepassdovetail cuts, limit yourdepths-of-cut to 1/4" for eachpass when using bits up to 1/2"in diameter to cut hardwoods.• Never exceed depths-of-cut of3/8" when using bits up to 1/2"in diameter to cut soft woods.• When using bits over 1/2" indiameter, limit your depths-ofcutto half the recommendeddepths for bits up to 1/2"diameter.• NEVER feed your workpiecebetween the rotating router bitand a fence, as this could causea kickback.• When stop routing, always usestop block(s) to control thelength of cut. Failure to usestop block(s) could cause akickback.• NEVER install a router bitwithout first unplugging therouter motor.• Make sure the router bit issecured firmly in the collet.Loose bits could work free andcause serious injury.• Insert bits all the way into thecollet and retract them about 1/8" to avoid transferring vibrationsand heat to the motorarmature.• Listen carefully for sounds ofchattering or looseness at startup.If you hear, see, or suspectproblems, turn off the toolimmediately, unplug it andcheck it out thoroughly. Correctthe problem before proceeding.• NEVER try to make your owncollet adaptor to hold differentsized bits. Balance is veryimportant at high speeds, soalways use purchased adapters.• Keep router bits clean and sharpat all times.• Attach the routing system to adust collection system . . . orwear a close-fitting dust mask.SPECIAL CAUTIONS ANDCONSIDERATIONS ONMATERIALS ANDTECHNIQUESBecause routers are powerful,high-speed tools with uniqueperformance characteristics, youmust pay particular attention to thematerials and techniques you areusing to avoid mistakes and safetyhazards.• All hardwoods should beworked in light, multiple passeswithout pausing or dwelling toavoid burning the workpiece.Open grained hardwoods suchas oak and similar species willsplinter very easily when youreach the end of a crossgraincut. For this reason, it's alwaysa good idea to either make verylight passes, leave extra stockon the width of the workpieceso the splintered area can be cutaway or backup your workpiecewith a scrap block at the exitpoint of the bit. Another goodtechnique to avoid splintering isto make all cross-grain cutsfirst, then make your cuts withthe grain.• Softer woods such as lauan,basswood, pine and willow canbe worked in slightly heavierpasses but "tear" or "fuzz"easily and will require morefinish sanding.• Highly figured woods such asbirdseyes, crotchwoods andburls have an inconsistency ofgrain that requires cautious,light passes to produce a cleancut.• Particleboard and similar compositematerials contain highconcentrations of glue that canquickly dull high-speed steelbits. Therefore, it is recommendedthat you always usecarbide-tipped or solid carbidebits when working these materials.• Plastic laminates are very hardmaterials that can also dullhigh-speed steel bits quickly.Again, always use carbide-